
Pattern guide
Helpful notes for making this pattern
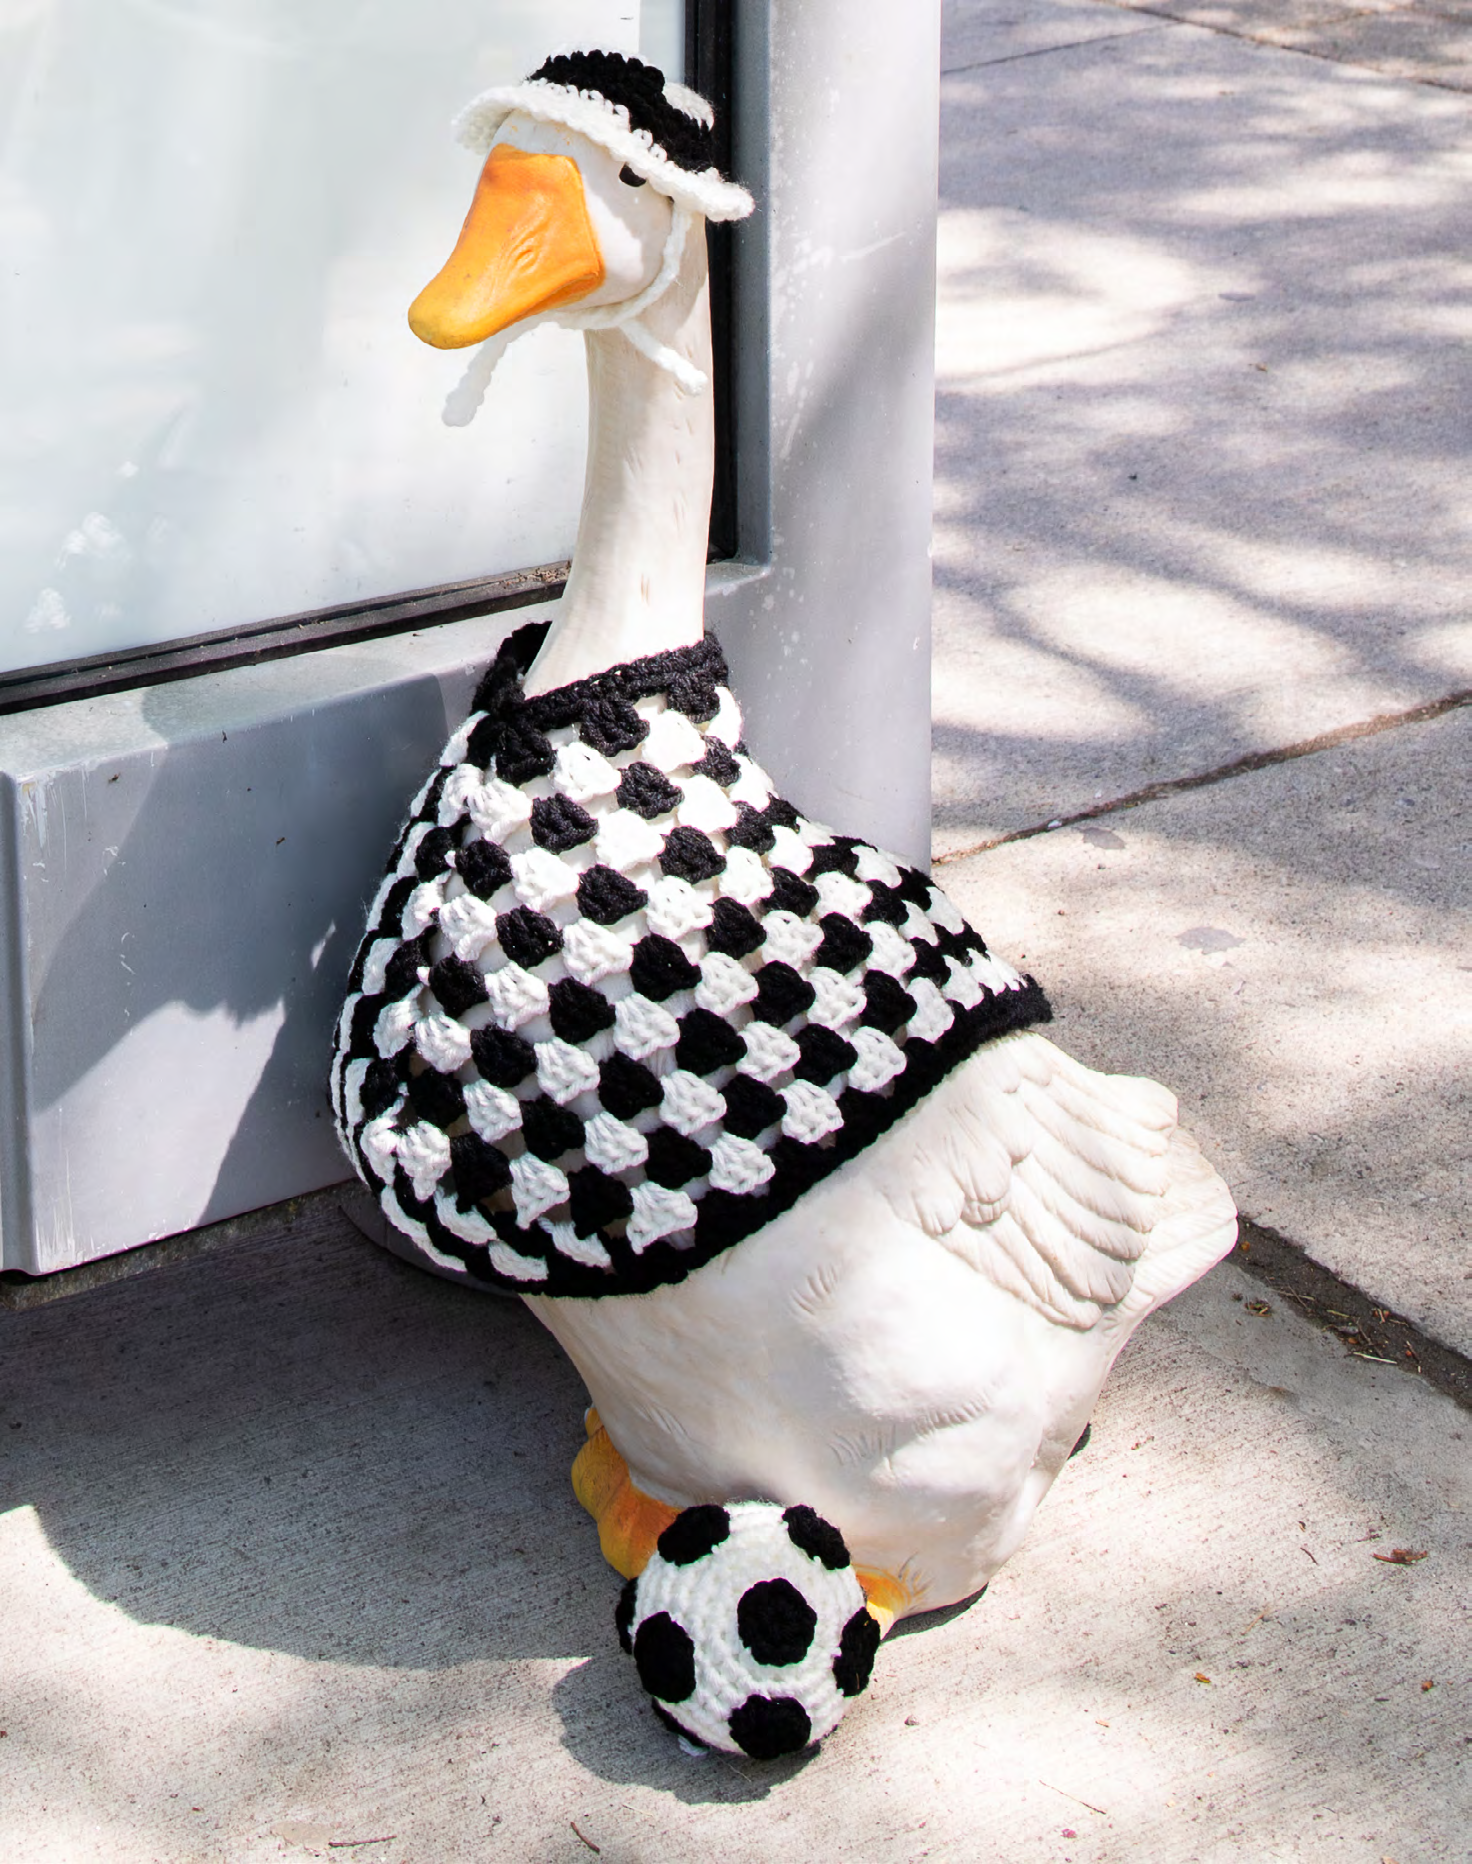
The Free Crochet Soccer Ball Pillow Pattern is a delightful project that combines functionality with fun, making it an ideal choice for both kids and adults who love soccer. This pattern is designed for beginners but offers enough detail to engage more experienced crocheters. With a cozy, oversized design, this pillow not only serves as a playful decor piece but also provides comfort during game days or movie nights. The unique shape and vibrant colors will surely brighten up any room, making it a perfect gift for soccer enthusiasts or a charming addition to your home decor.
Why this project is worth making
- It's a unique and playful decor item that adds character to any room.
- The project is beginner-friendly, making it a great way to practice basic crochet techniques.
- It serves as a fun and functional gift for soccer fans, especially children.
Maker tips before you begin
- Ensure you have enough yarn before starting; running out mid-project can disrupt your flow.
- Use a stitch marker to keep track of your rounds, especially since the pattern involves increasing stitches.
- Consider making the pillow cover removable for easy washing; you can use a zipper or button closure.
- Take your time with the shaping of the legs and arms to ensure they are proportional and secure.
Ways to customize it
- Experiment with different color combinations to match the decor of the intended room.
- Adjust the size by increasing or decreasing the number of rounds in the pillow's body.
- Add personalized patches or embroidery to make the pillow even more special for the recipient.
Troubleshooting notes
- If your stitches are too tight, try using a larger hook to achieve the desired gauge and flexibility.
- To avoid uneven shaping, count your stitches regularly, especially during the increase rounds.
- If the pillow becomes misshapen after stuffing, consider using a firmer stuffing material to maintain its round shape.
Care and finishing
- After completing your pillow, block it to ensure it maintains its shape and dimensions.
- For washing, use a gentle cycle and air dry to preserve the integrity of the yarn and maintain the pillow's appearance.
Instructions
Pillow Front & Back (Make 2 alike)
0/10Notes
- •Work directly into next stitch, noting marker to indicate end of round will move up each round.
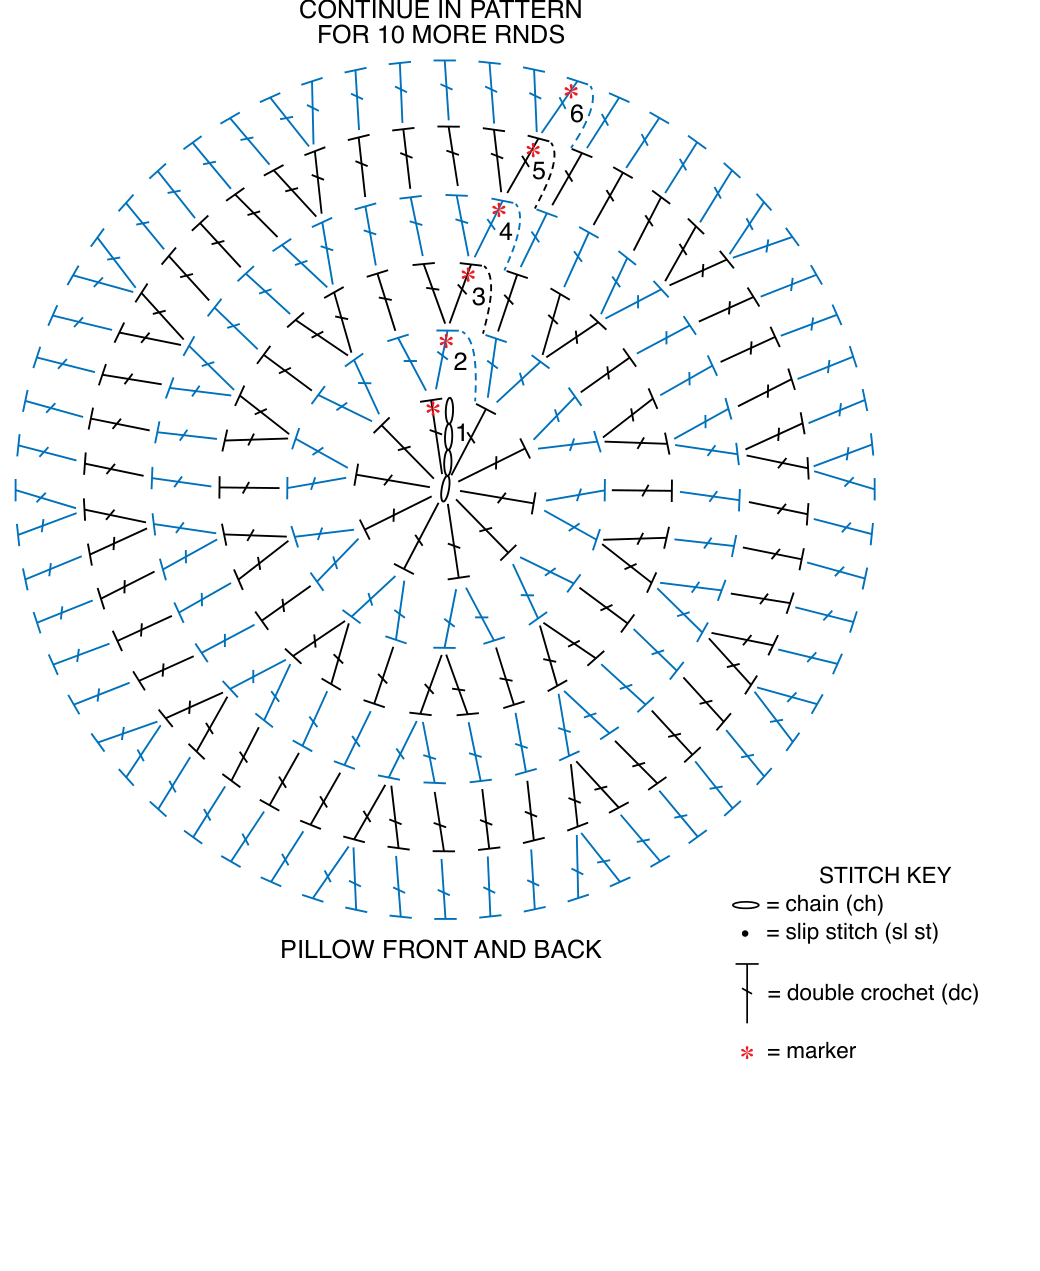
With A, ch 4.
1st rnd: 10 dc in 4th ch from hook. PM on first dc. Do not join.
2nd rnd: 2 dc in each dc around. 20 dc.
3rd rnd: *2 dc in first dc. 1 dc in next dc. Rep from * around. 30 dc.
4th rnd: *2 dc in first dc. 1 dc in each of next 2 dc. Rep from * around. 40 dc.
5th rnd: *2 dc in first dc. 1 dc in each of next 3 dc. Rep from * around. 50 dc.
6th rnd: *2 dc in first dc. 1 dc in each of next 4 dc. Rep from * around. 60 dc.
Cont as established, inc 10 dc every rnd for 10 more rnds. 160 dc.
Sl st in first dc at end of last rnd.
Fasten off.
Make Leg and Arm Casings
0/3Stuff legs of pantyhose/stockings lightly to create 4 ‘casings’ approx 7½" [19.5 cm] circumference x 15" [38 cm] long.
Cut pantyhose/stockings and tie tightly at ends to close.
You should be able to make 2 casings out of each pantyhose/stocking leg.
Legs (Make 2 alike)
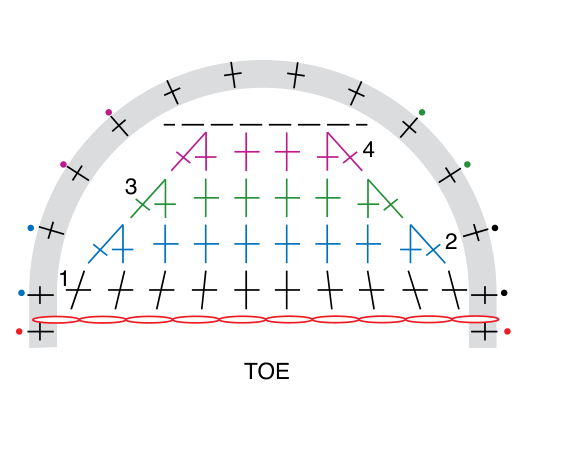
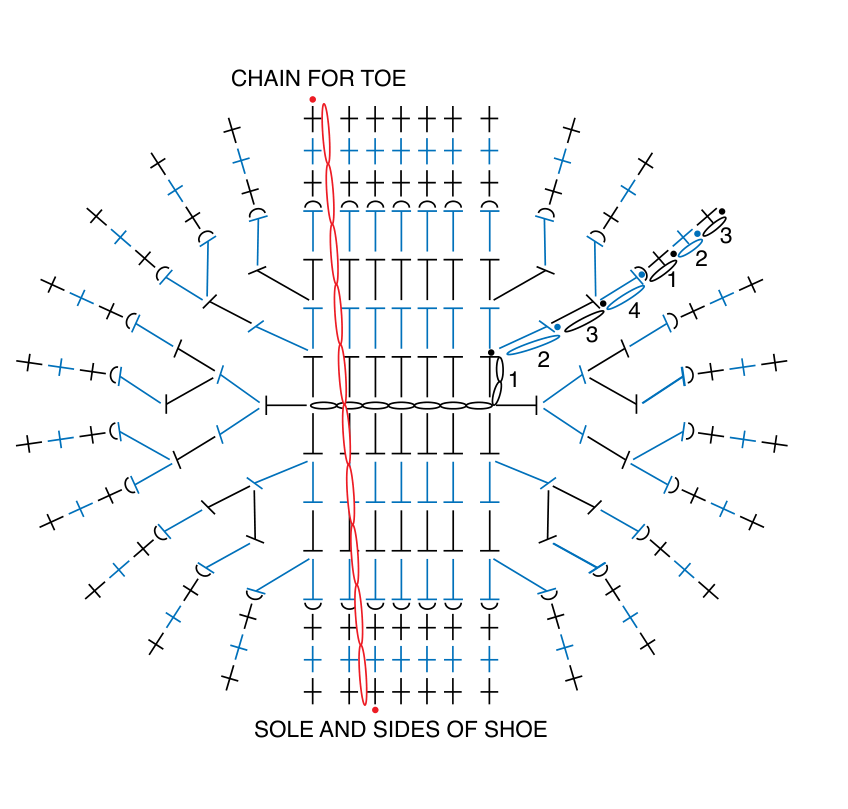
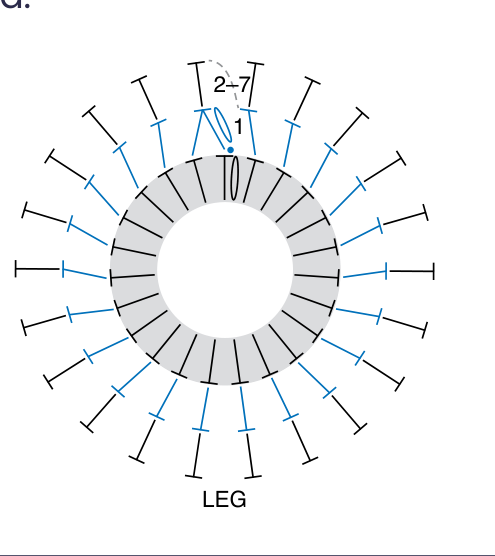
0/9Beg at Sole of Shoe: With A, ch 9.
1st rnd: 1 hdc in 3rd ch from hook. 1 hdc in each of next 5 ch. 3 hdc in last ch.
Working into rem loops of foundation ch, 1 hdc in each of next 5 ch.
2 hdc in last ch (same ch as first hdc). Join with sl st to first hdc. 16 hdc.
2nd rnd: Ch 1. 2 hdc in first hdc. 1 hdc in each of next 5 hdc. 2 hdc in each of next 3 hdc. 1 hdc in each of next 5 hdc.
2 hdc in each of last 2 hdc. Join with sl st to first hdc. 22 hdc.
3rd rnd: Ch 1. 1 hdc in first hdc. 2 hdc in next hdc. 1 hdc in each of next 5 hdc.
(2 hdc in next hdc. 1 hdc in next hdc) 3 times. 1 hdc in each of next 6 hdc.
2 hdc in next hdc. 1 hdc in next hdc. Join with sl st to first hdc. 28 hdc.
Shoe and Sock
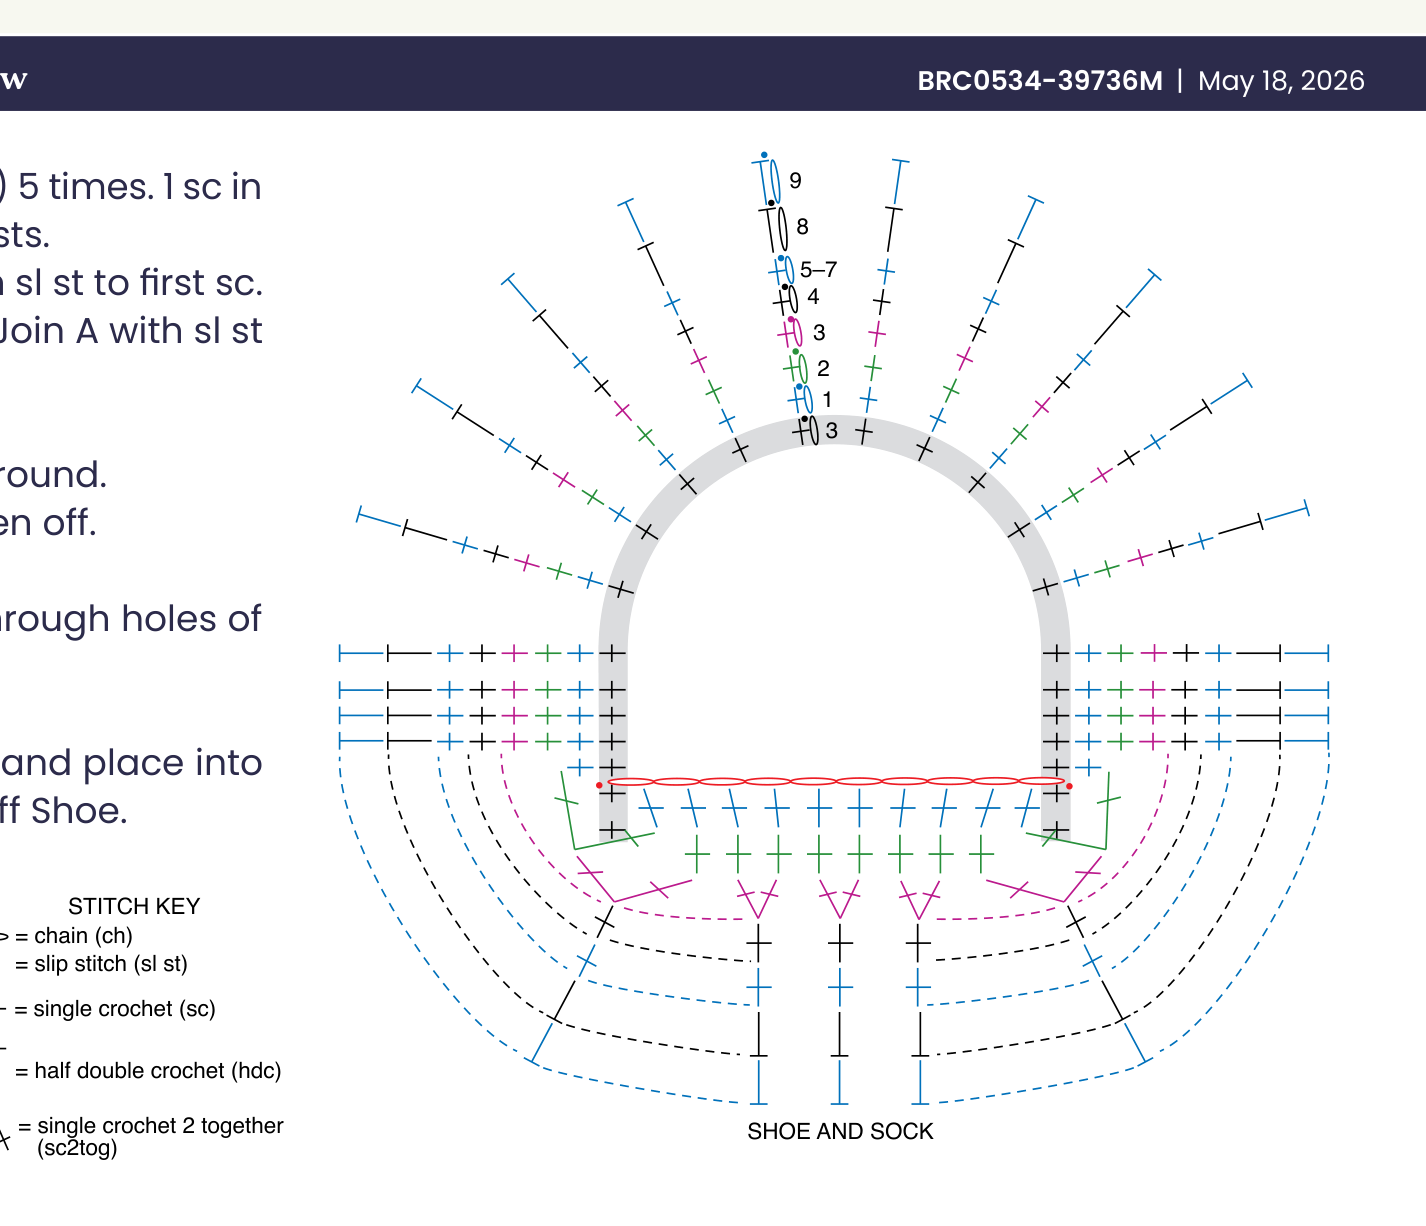
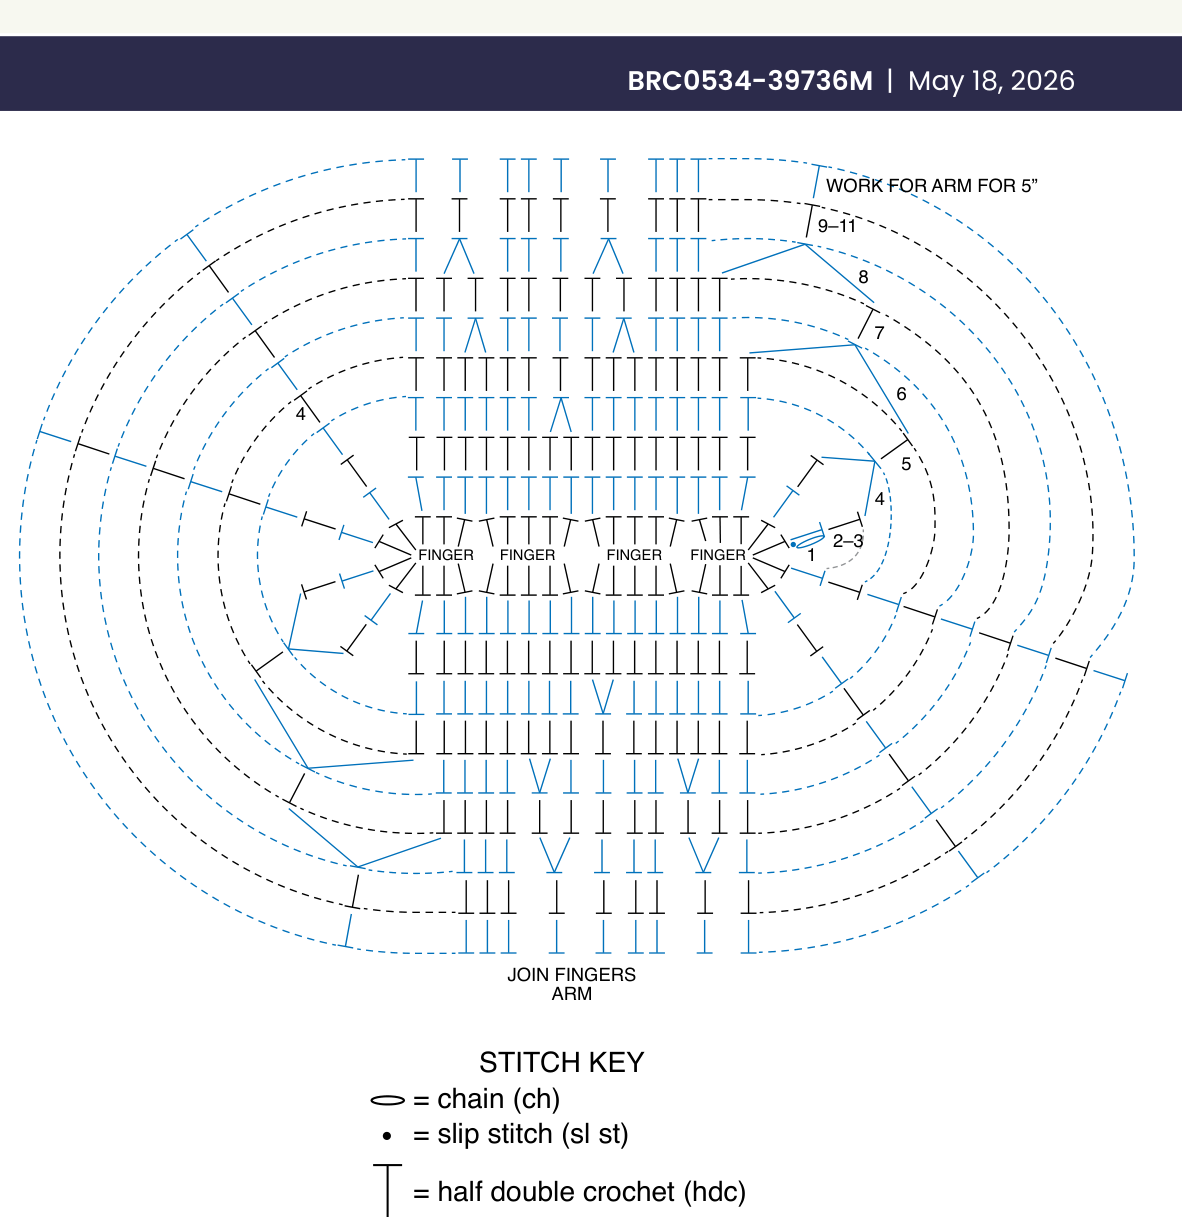
0/18Join C with sl st to first sc of 3rd rnd of Side.
1st rnd: Ch 1. 1 sc in each of next 10 sc.
Working in rem loop of Toe ch-10, 1 sc in each of next 10 ch.
1 sc in each of last 10 sc of 3rd rnd of Side.
Join with sl st in next sc.
2nd rnd: Ch 1. 1 sc in each of next 9 sc. Sc2tog. 1 sc in each of next 8 sc. Sc2tog.
1 sc in each sc to end of rnd. Join with sl st to first sc. 28 sts.
3rd rnd: Ch 1. 1 sc in each of next 9 sc. (Sc2tog) 5 times. 1 sc in each of last 9 sc.
Join with sl st to first sc. 23 sts.
4th rnd: Ch 1. 1 sc in each st around. Join with sl st to first sc.
5th to 7th rnds: Ch 1. 1 sc in each sc around.
Join A with sl st to first sc at end of 7th rnd.
8th rnd: With A, ch 1. 1 hdc in each sc around.
9th rnd: Ch 1. 1 hdc in each hdc around. Fasten off.
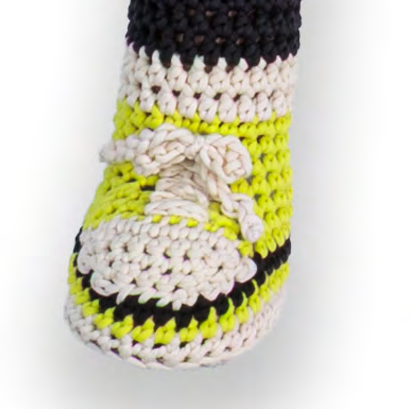
Shoelaces: With A, ch 70. Fasten off.
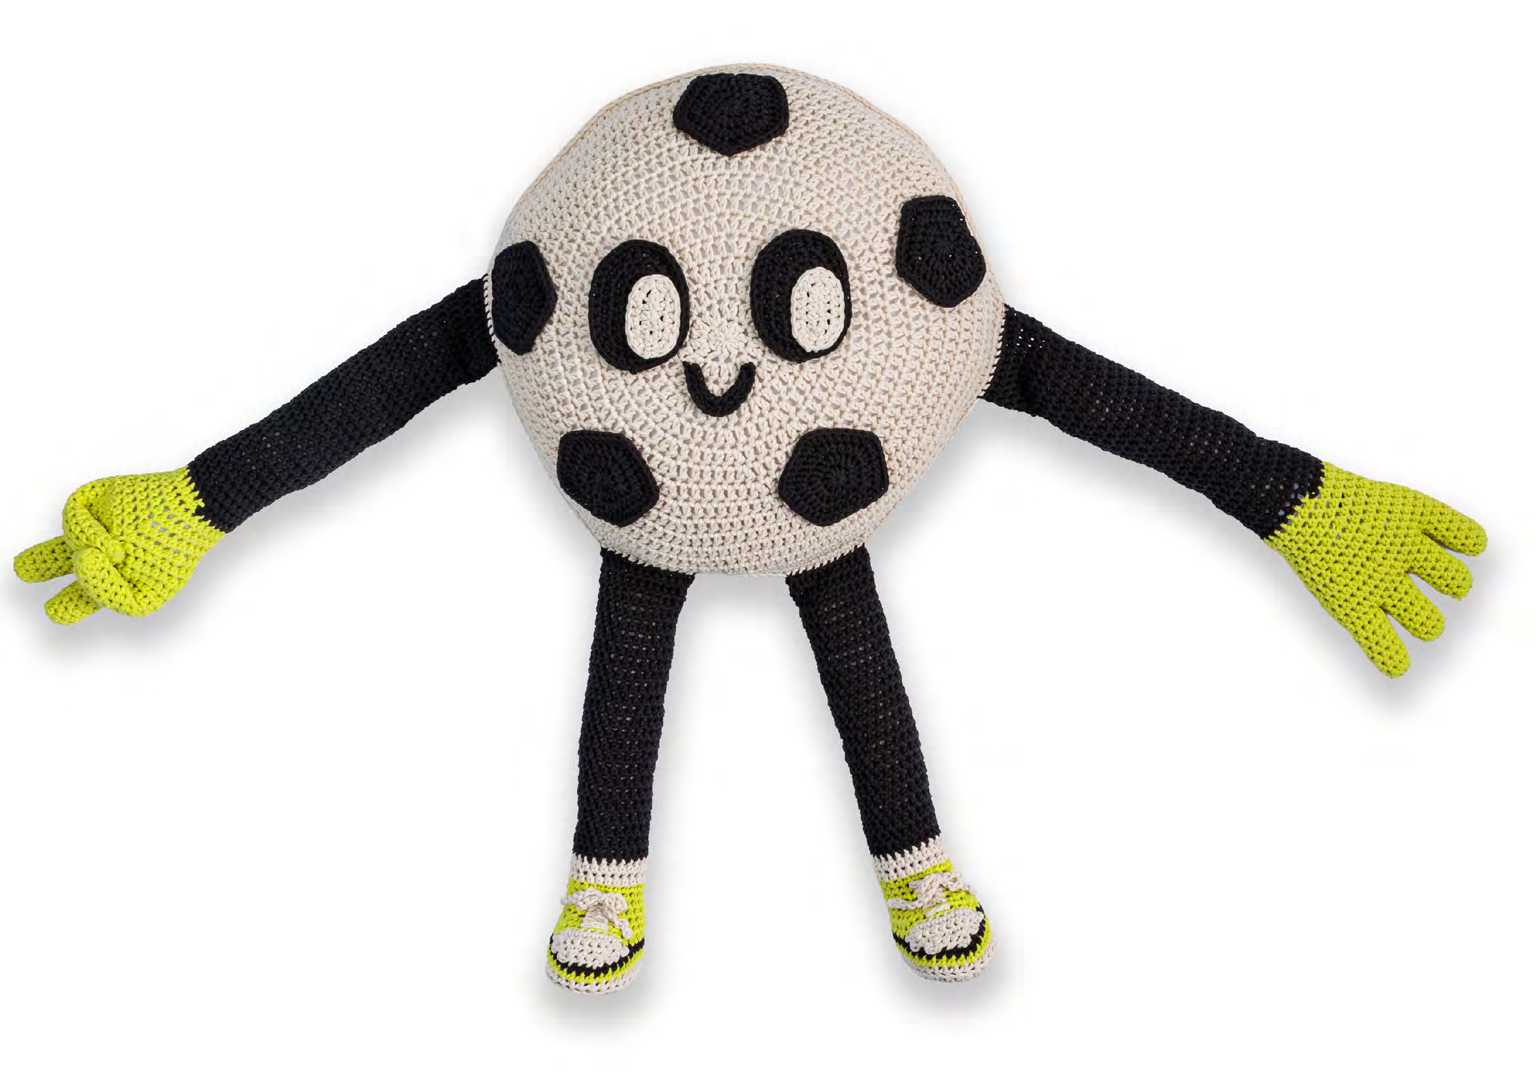
‘Lace’ through holes of sc at front of Shoe and tie in bow as shown.
Trace Sole of Shoe onto piece of cardboard and place into Shoe to add structure and keep sole flat.
Stuff Shoe.
Eyes and Smile
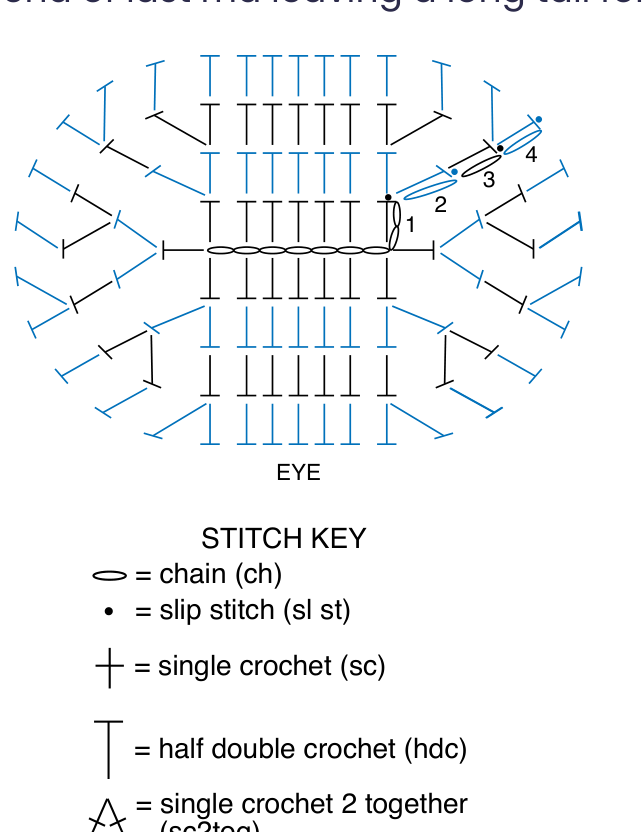
0/14Eyes (Make 2 alike): With B, ch 9.
With A, ch 7.
1st rnd: 1 hdc in 3rd ch from hook. 1 hdc in each of next 3 ch.
3 hdc in last ch. Working into rem loops of foundation ch, 1 hdc in each of next 3 ch.
2 hdc in last ch. Join with sl st to first hdc.
2nd rnd: Ch 1. 2 hdc in first hdc. 1 hdc in each of next 3 hdc.
2 hdc in each of next 3 hdc. 1 hdc in each of next 3 hdc.
2 hdc in each of last 2 hdc. Join with sl st to first hdc.
Fasten off, leaving a long tail for sewing.
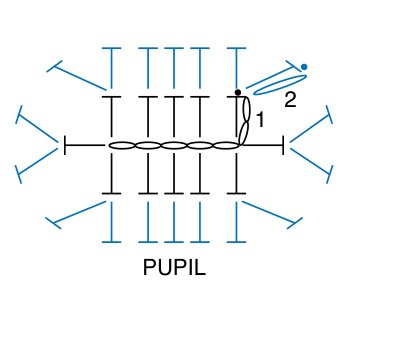
Using tail, sew Pupil to Eye at center bottom as shown in photo.
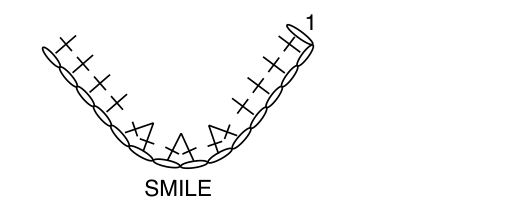
Smile: With B, ch 15.
1st row: 1 sc in 2nd ch from hook. 1 sc in each of next 3 ch.
(Sc2tog) 3 times. 1 sc in each of last 4 ch.
Fasten off, leaving a long tail for sewing.
Finishing
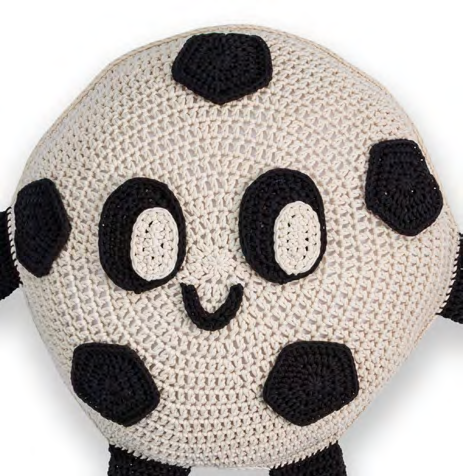
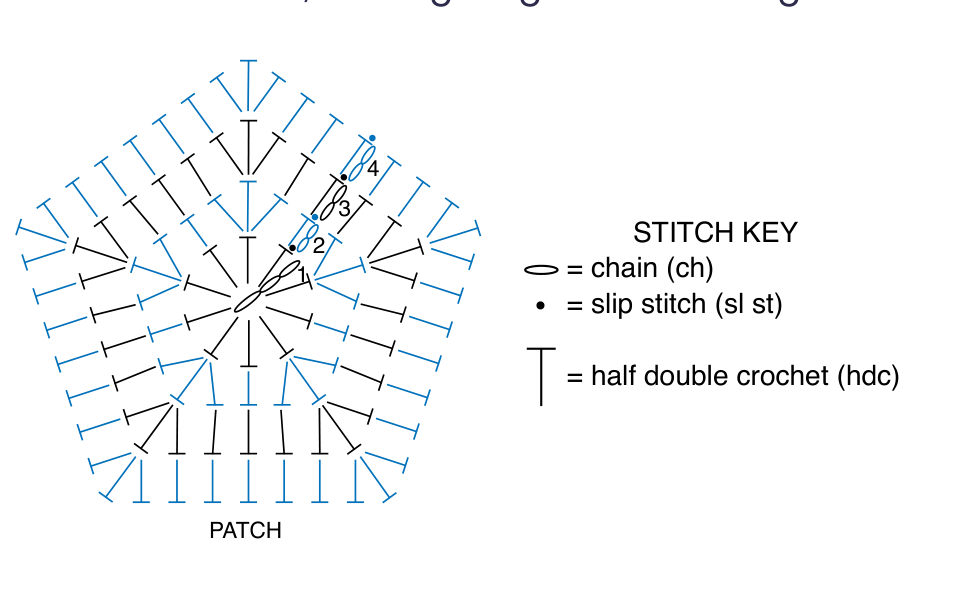
0/11Pin Eyes, Smile, and Patches into place on Front.
Sew into position using long tails from fasten off.
Join Front and Back: 1st rnd: 10 hdc in 3rd ch from hook.
Join with sl st to first hdc. 10 hdc.
2nd rnd: Ch 2. *1 hdc in next hdc. 3 hdc in next hdc. Rep from * around.
Join with sl st to first hdc. 20 hdc.
3rd rnd: Ch 2. 1 hdc in each of next 2 hdc. *3 hdc in next hdc. 1 hdc in each of next 3 hdc. Rep from * to last hdc.
3 hdc in last hdc. Join with sl st to first hdc. 30 hdc.
4th rnd: Ch 2. 1 hdc in each of next 3 hdc. *3 hdc in next hdc. 1 hdc in each of next 5 hdc. Rep from * to last 3 hdc.
3 hdc in next hdc. 1 hdc in each of last 2 hdc. Join with sl st to first hdc. 40 hdc.
Fasten off, leaving long tail for sewing.
FAQ
Questions about this pattern
Is Free Crochet Soccer Ball Pillow Pattern good for beginners?+
Yes. Free Crochet Soccer Ball Pillow Pattern is marked easy and includes step-by-step instructions, materials, gauge notes, and progress checkboxes.
What yarn weight do I need for Free Crochet Soccer Ball Pillow Pattern?+
This pattern lists Bulky (5). If you substitute yarn, make a gauge swatch before starting so the finished size stays close to the pattern notes.
How long does Free Crochet Soccer Ball Pillow Pattern take to crochet?+
The estimated time is 15–20 hours. Your pace may change depending on yarn choice, stitch familiarity, and how much finishing the project needs.
Do I need to check gauge for this crochet pattern?+
Yes. The pattern gauge is 10 sc and 11 rows = 4" [10 cm]. Use the listed hook size, U.S L/11 (8 mm), unless your swatch tells you to adjust. Checking gauge helps avoid a finished project that is too small, too large, or too stiff.
Can I print Free Crochet Soccer Ball Pillow Pattern?+
Yes. Use the Print button near the top of the post for a cleaner pattern view that hides interactive extras and navigation.