Instructions
Free crochet bunny and bear teether pattern Basics
0/12Notes
- •This Free crochet bunny and bear teether pattern includes organized steps, materials, and helpful resources for crocheters.
- •For more baby-friendly patterns, check out our baby crochet patterns.
With A, make an adjustable ring: Wrap yarn into a ring, ensuring that the tail falls behind the working yarn. Grip ring and tail between middle finger and thumb. Insert hook through center of ring, yarn over (with working yarn) and draw up a loop. Work stitches of first round in the ring. After the first round of stitches is worked, pull gently on tail to tighten ring.
1st rnd: Ch 1. 8 sc in ring. Join with sl st in first sc. 8 sc.
2nd rnd: Ch 1. 2 sc in same sp as sl st. 2 sc in each sc around. Join. 16 sc.
3rd rnd: Ch 1. 2 sc in same sp as sl st. 1 sc in next sc. *2 sc in next sc. 1 sc in next sc. Rep from * around. Join. 24 sc.
4th rnd: Ch 1. 2 sc in same sp as sl st. 1 sc in each of next 2 sc. *2 sc in next sc. 1 sc in each of next 2 sc. Rep from * around. Join. 32 sc.
5th rnd: Ch 1. 2 sc in same sp as sl st. 1 sc in each of next 3 sc. *2 sc in next sc. 1 sc in each of next 3 sc. Rep from * around. Join. 40 sc.
6th rnd: Ch 1. 2 sc in same sp as sl st. 1 sc in each of next 4 sc. *2 sc in next sc. 1 sc in each of next 4 sc. Rep from * around. Join. 48 sc.
7th to 12th rnds: Ch 1. 1 sc in each sc around. Join.
13th rnd: Ch 1. 1 sc in each of first 2 sc. Sc2tog. *1 sc in each of next 2 sc. Sc2tog. Rep from * around. Join. 36 sts.
14th rnd: Ch 1. 1 sc in first sc. Sc2tog. *1 sc in next st. Sc2tog. Rep from * around. Join. 24 sts.
15th rnd: Ch 1. *Sc2tog. Rep from * around. Join with sl st in first st. 12 sts.
Fasten off, leaving a 12-18" [30.5-45.5 cm] long tail. Stuff head firmly. Thread long tail through rem sts and pull to close opening. Secure end but do not cut tail, it will be used later to sew Head to covered ring.
Bunny Nose
0/3With A (Yellow), make an adjustable ring as given for Head.
1st to 4th rnds: As 1st to 4th rnds of Head. 32 sc at end of last rnd.
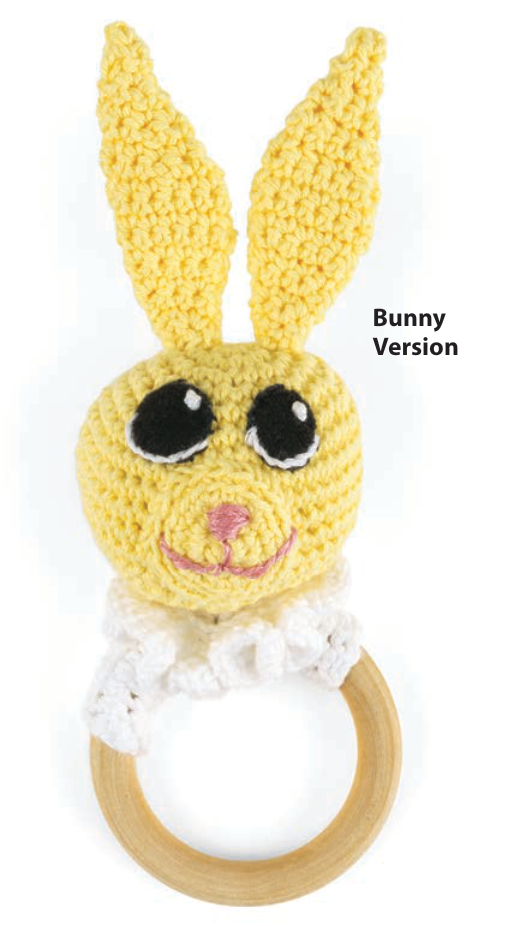
Fasten off, leaving a long tail. With yarn tail, sew Nose to Head adding a very small amount of polyfill to Nose as you sew.
Bunny Ears (make 2)
0/15With A (Yellow), ch 6, leaving a long tail for sewing Ear to Head.
1st row: 1 sc in 2nd ch from hook and in each ch to end of chain. Turn. 5 sc.
2nd row: Ch 1. 1 sc in first sc. (2 sc in next sc. 1 sc in next sc) twice. Turn. 7 sc.
3rd row: Ch 1. 1 sc in each sc to end of row. Turn.
4th row: Ch 1. (1 sc in each of first 2 sc. 2 sc in next sc) twice. 1 sc in last st. Turn. 9 sc.
5th row: As 3rd row.
6th row: Ch 1. (1 sc in each of first 3 sc. 2 sc in next st) twice. 1 sc in last st. Turn. 11 sc.
7th to 9th rows: As 3rd row.
10th row: Ch 1. (1 sc in each of first 3 sc. Sc2tog) twice. 1 sc in last st. Turn. 9 sts.
11th and alt rows: As 3rd row.
12th row: Ch 1. (1 sc in first 2 sc. Sc2tog) twice. 1 sc in last st. Turn. 7 sts.
14th row: Ch 1. (1 sc in first st. Sc2tog) twice. 1 sc in last st. Turn. 5 sts.
16th row: Ch 1. Sc2tog. 1 sc in next st. Sc2tog. Turn. 3 sts.
17th row: As 3rd row.
Fasten off, leaving a long tail for sewing. Using photograph as a guide, sew Ears to Head.
Bunny Eyes (make 2)
0/4Cut two ¾" [19 mm] circles from black felt.
Using photograph as a guide, applique Eyes to Head.
With white embroidery floss, embroider outline stitch along lower edge of each Eye.
With white embroidery floss, embroider a French knot on each Eye as highlight.
Bear Nose
0/4With A (Dark Dogwood), make an adjustable ring as given for Head.
1st to 3rd rnds: As 1st to 3rd rnds of Head. 24 sc at end of last rnd.
4th rnd: Ch 1. 1 sc in each sc around. Join.
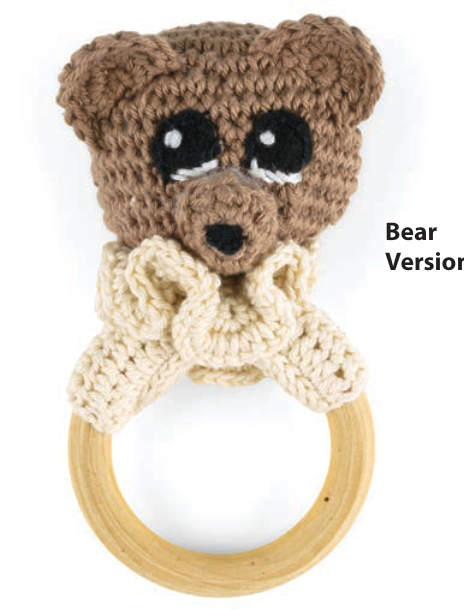
Fasten off, leaving a long tail. With yarn tail, sew Nose to Head adding a very small amount of polyfill to Nose as you sew.
Bear Ears (make 2)
0/4With A (Dark Dogwood), make an adjustable ring as given for Head.
Row 1: 4 sc in ring. Turn. 4 sc.
Row 2: Ch 2 (does not count as st). 2 hdc in each hdc to end of row. Turn. 8 hdc.
Row 3: Ch 1. 1 sc in each st to end of row. Fasten off, leaving a long tail for sewing. Using photograph as a guide, sew Ears to Head.
Bear Eyes (make 2)
0/4Cut two ½" [13 mm] circles from black felt.
Using photograph as a guide, applique Eyes to Head.
With white embroidery floss, embroider outline stitch along lower edge of each Eye.
With white embroidery floss, embroider a French knot on each Eye as highlight.
Ring Cover
0/4Notes
- •Refer to the Craft Yarn Council for standard yarn weights.
With B (White for Bunny, Natural for Bear), ch 23. Weave in ends.
1st row: 1 hdc in 3rd ch from hook and in each ch to end of chain. Turn. 21 hdc.
2nd to 5th rows: Ch 2. 1 hdc in each st to end of row. Turn.
Joining row: Wrap cover over ring and bring first and last row tog with sts matching. Working through both thicknesses, slip st in each st across to attach cover to ring. Fasten off and weave in end.
Ruff
0/3With B (White for Bunny, Natural for Bear), ch 16.
1st row: 2 sc in 2nd ch from hook and in each ch to end of chain. Turn. 30 sc.
2nd and 3rd rows: Ch 1. 2 sc in each sc to end of row. Turn. 60 sc. Fasten off at end of last row, leaving a long tail for sewing.
Finishing
0/2Notes
- •Browse our patterns catalog for more ideas.
- •Find more patterns on Ravelry.
With yarn tail still attached to Head, sew Head to center of Ring Cover.
Place Ruff around base of Head, where it is joined to Ring Cover. With yarn tail still attached to Ruff, sew short ends of Ruff together. Weave in ends.
FAQ
Questions about this pattern
Is Free Crochet Bunny and Bear Teether Pattern good for beginners?+
Yes. Free Crochet Bunny and Bear Teether Pattern is marked easy and includes step-by-step instructions, materials, gauge notes, and progress checkboxes.
What yarn weight do I need for Free Crochet Bunny and Bear Teether Pattern?+
This pattern lists Worsted (4). If you substitute yarn, make a gauge swatch before starting so the finished size stays close to the pattern notes.
How long does Free Crochet Bunny and Bear Teether Pattern take to crochet?+
The estimated time is 2-3 hours. Your pace may change depending on yarn choice, stitch familiarity, and how much finishing the project needs.
Do I need to check gauge for this crochet pattern?+
Yes. The pattern gauge is 22 sc and 24 rows = 4" [10 cm]. Use the listed hook size, U.S. D/3 (3.25 mm), unless your swatch tells you to adjust. Checking gauge helps avoid a finished project that is too small, too large, or too stiff.
Can I print Free Crochet Bunny and Bear Teether Pattern?+
Yes. Use the Print button near the top of the post for a cleaner pattern view that hides interactive extras and navigation.