Instructions
Free crochet peplum cardigan pattern Basics
0/3Notes
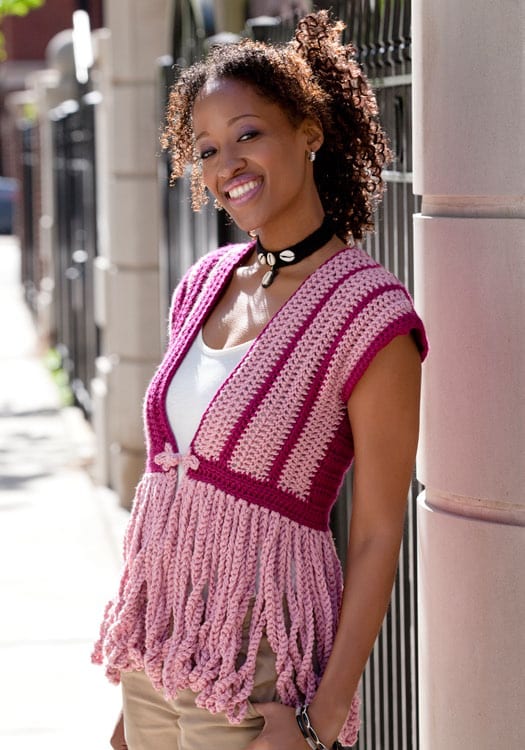
- •This Free crochet peplum cardigan pattern includes organized steps, materials, and helpful resources for crocheters.
- •The cardigan is worked from the edges of the Sleeve to the center of the Upper Fronts and Upper Back, reversing colors. Find more crochet clothing patterns like this one.
With 5mm (US H-8) hook and A, ch 50 (52, 54, 58, 60, 64), slip st in first ch to join. Place marker for beginning of round.
Round 1: Ch 3 (counts as dc here and throughout), dc in each ch around, slip st in top of beginning ch – 50 (52, 54, 58, 60, 64) dc.
Round 2: Ch 3, dc in each dc around, slip st in top of beginning ch.
Upper Right Back
0/8Row 1: Ch 3, dc in next 26 (27, 28, 30, 31, 34) dc, leave remaining sts unworked for Upper Right Front – 27 (28, 29, 32, 33, 35) dc.
Row 2-3: Ch 3, turn, dc in each dc across.
Row 4: With B, ch 2 (counts as hdc here and throughout), turn, hdc in each dc across.
Row 5: Ch 2, turn, hdc in each hdc across.
Row 6: With A, ch 3, turn, dc in each hdc across.
Row 7: Ch 3, turn, dc in each dc across.
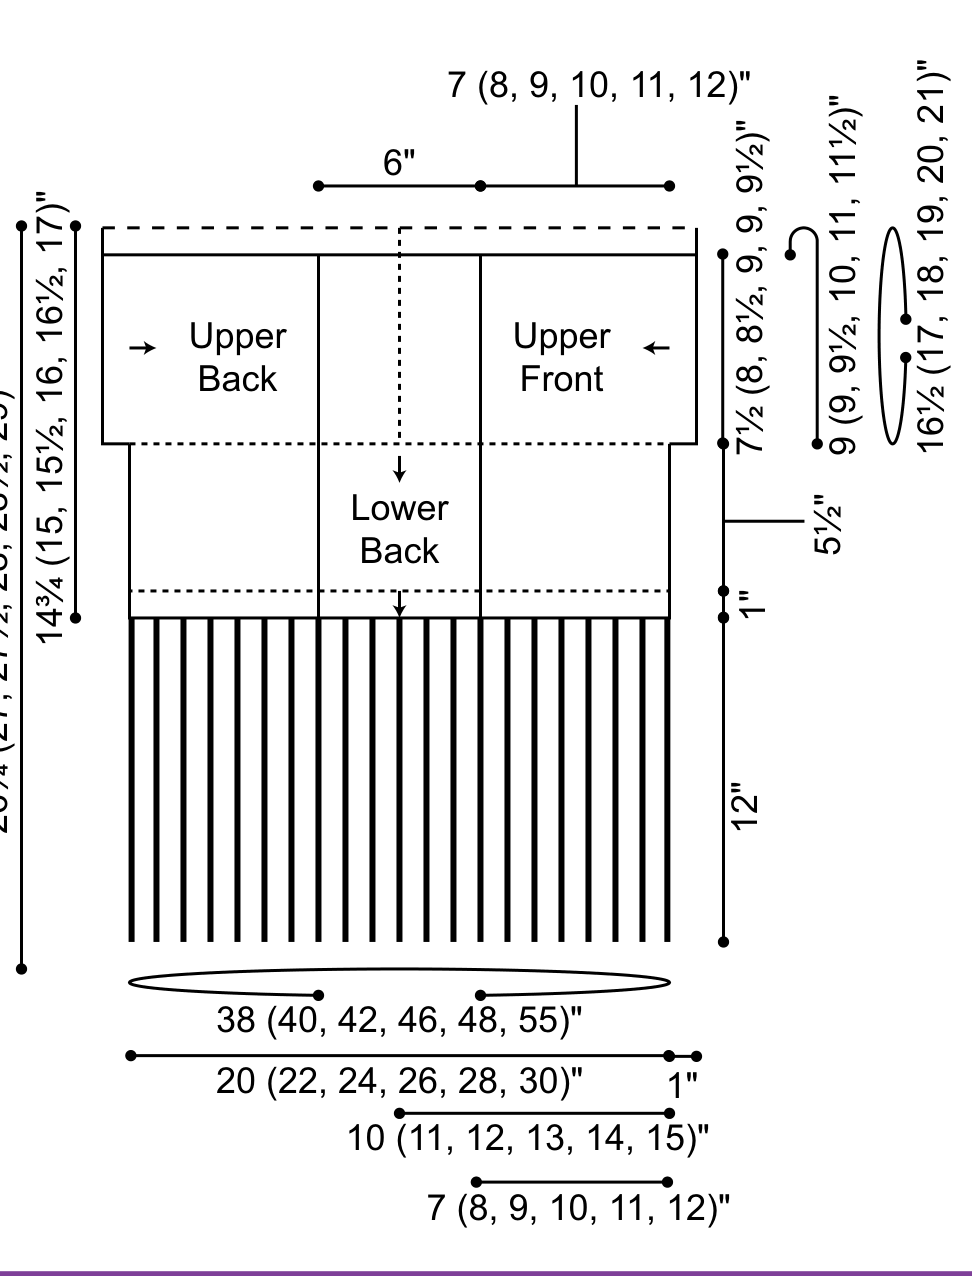
Repeat Rows 4-7 until Back has been worked for 23 (25, 27, 29, 31, 35) rows, end with second row of stripe color. Upper Back measures 10 (11, 12, 13, 14, 15)".
Fasten off.
Left Sleeve
0/3With 5mm (US H-8) hook and B, ch 50 (52, 54, 58, 60, 64), slip st in first ch to join. Place marker for beginning of round.
Round 1: Ch 3, dc in each ch around, slip st in top of beginning ch – 50 (52, 54, 58, 60, 64) dc.
Round 2: Ch 3, dc in each dc around, slip st in top of beginning ch.
Upper Left Back
0/8Row 1: Ch 3, dc in next 26 (27, 28, 30, 31, 34) dc, leave remaining sts unworked for Upper Left Front – 27 (28, 29, 32, 33, 35) dc.
Row 2-3: Ch 3, turn, dc in each dc across.
Row 4: With A, ch 2, turn, hdc in each dc across.
Row 5: Ch 2, turn, hdc in each hdc across.
Row 6: With B, ch 3, turn, dc in each hdc across.
Row 7: Ch 3, turn, dc in each dc across.
Repeat Rows 4-7 until Back has been worked for 23 (25, 27, 29, 31, 35) rows, end with second row of stripe color. Upper Back measures 10 (11, 12, 13, 14, 15)".
Fasten off.
Center Back Joining
0/2With wrong sides facing, 5mm (US H-8) hook and working through both layers of Upper Backs, join A in first st and sc in each st across to join Upper Backs together along center back seam.
Fasten off.
Lower Back
0/3Row 1: With right side facing, 5mm (US H-8) hook and working along lower edge of Upper Backs, join B in first st of Back, ch 3, dc 61 (65, 71, 77, 83, 89) sts evenly spaced across to first row of opposite Upper Back – 62 (66, 72, 78, 84, 90) dc.
Rows 2-11: Ch 3, turn, dc in each dc across.
Fasten off.
Upper Left Front
0/6Row 1: With right side facing and 5mm (US H-8) hook, join A in first unworked st on Sleeve, ch 3, dc in next 22 (23, 24, 26, 27, 28) sts along front edge of Sleeve, working along edge of rows of Lower Back, dc 17 sts evenly spaced along rows – 40 (41, 42, 44, 45, 46) sts.
Rows 2-4: Ch 3, turn, dc in each dc across.
Rows 5-6: Change to B, ch 2, turn, hdc in each st across.
Rows 7-10: Change to A, ch 3, turn, dc in each dc across.
Repeat Rows 5-10 until Upper Left Front measures 7 (8, 9, 10, 11, 12)".
Fasten off.
Upper Right Front
0/6Row 1: With right side facing and 5mm (US H-8) hook, join B in first unworked st on Sleeve, ch 3, dc in next 22 (23, 24, 26, 27, 28) sts along front edge of Sleeve, working along edge of rows of Lower Back, dc 17 sts evenly spaced along rows – 40 (41, 42, 44, 45, 46) sts.
Rows 2-4: Ch 3, turn, dc in each dc across.
Rows 5-6: Change to A, ch 2, turn, hdc in each st across.
Rows 7-10: Change to B, ch 3, turn, dc in each dc across.
Repeat Rows 5-10 until Upper Right Front measures 7 (8, 9, 10, 11, 12)".
Fasten off.
Shoulders
0/4Notes
- •For gauge details, refer to the Craft Yarn Council standards.
Mark center 6" along top edge of Upper Back for Neck.
Joining Row: With wrong sides facing, 5mm (US H-8) hook and working through both layers of Upper Back and Upper Front, join A in first st and slip st across Shoulders to Neck marker to join Upper Back and Front Shoulders.
Fasten off.
Repeat for second Shoulder.
Waistband
0/3Row 1: With right side facing and 5mm (US H-8) hook, join B lower edge of Left Front, ch 2, work 26 (27, 28, 30, 33, 40) hdc evenly along Upper Left Front, 62 (66, 72, 78, 84, 90) hdc along lower edge of Back, 26 (27, 28, 30, 33, 40) hdc evenly along lower edge of Upper Right Front – 114 (120, 128, 138, 150, 166) hdc.
Rows 2-4: Ch 2, turn, hdc in each hdc.
Fasten off.
Fringe Peplum
0/2Notes
- •Browse the patterns catalog for more fun projects.
With right side facing, 6.5mm (US K-10½) hook and holding 2 strands of A together, join yarn at lower edge of Left Front, ch 70, slip st in next 2 hdc; repeat from * across, ch 70, slip st in last st.
Fasten off.
Finishing
0/7Notes
- •Join a community of crafters on Ravelry to share your finished cardigan.
Edging: With right side facing and 5mm (US H-8) hook, join A at lower edge of Right Front above Fringe Peplum, ch 2, hdc in each st around neck edge to lower edge of Left Front, slip st in last st.
Weave in ends.
Right Frog Closure: With 3.75mm (US F-5) hook and A, ch 8, slip st in first ch to join, ch 11, slip st in same ch, ch 8, slip st in same ch, ch 7, slip st in same ch. Fasten off.
Left Frog Closure: With 3.75mm (US F-5) hook and A, ch 8, slip st in first ch to join, ch 11, slip st in same ch, ch 8, ch 5, hdc in 2nd ch from hook, work 5 more hdc in same ch, slip st in same 6 hdc, skip first hdc, slip st in next st. Fasten off.
Sew Right Frog Closure in Waistband of Right Front.
Sew Left Frog Closure in Waistband of Left Front, opposite Right Frog Closure.
Weave in ends.
FAQ
Questions about this pattern
Is Free Crochet Peplum Cardigan Pattern good for beginners?+
Yes. Free Crochet Peplum Cardigan Pattern is marked easy and includes step-by-step instructions, materials, gauge notes, and progress checkboxes.
What yarn weight do I need for Free Crochet Peplum Cardigan Pattern?+
This pattern lists Bulky (5). If you substitute yarn, make a gauge swatch before starting so the finished size stays close to the pattern notes.
How long does Free Crochet Peplum Cardigan Pattern take to crochet?+
The estimated time is 15–20 hours. Your pace may change depending on yarn choice, stitch familiarity, and how much finishing the project needs.
Do I need to check gauge for this crochet pattern?+
Yes. The pattern gauge is 12 dc = 4"; 8 rows = 4" using 5mm (US H-8) hook.. Use the listed hook size, 5mm (US H-8), unless your swatch tells you to adjust. Checking gauge helps avoid a finished project that is too small, too large, or too stiff.
Can I print Free Crochet Peplum Cardigan Pattern?+
Yes. Use the Print button near the top of the post for a cleaner pattern view that hides interactive extras and navigation.