Instructions
Free crochet prince bear pillow hat pattern Basics
0/32Notes
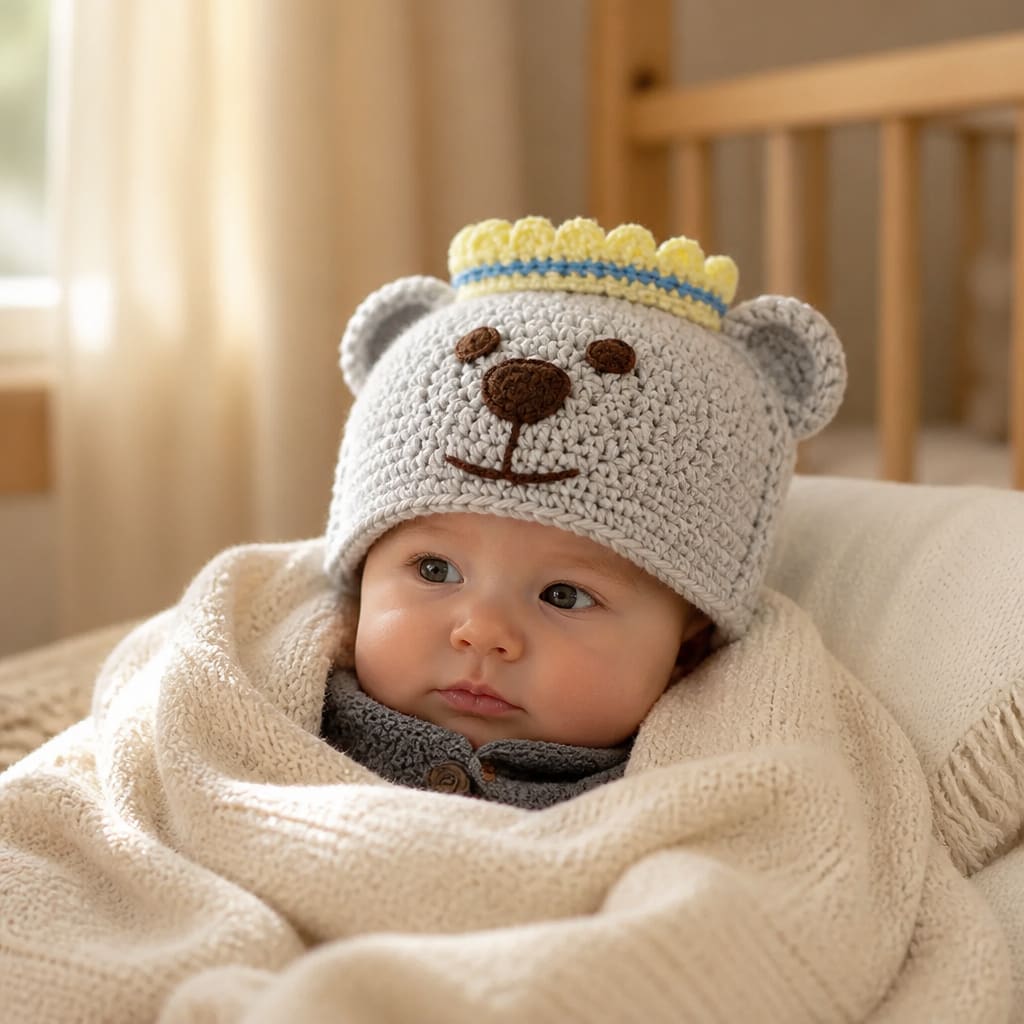
- •This Free crochet prince bear pillow hat pattern includes organized steps, materials, and helpful resources for crocheters.
- •Hat is worked from top down in joined rounds with right side facing at all times.
- •Earflaps are worked back and forth in rows.
- •Directions for hat are for size Baby. Changes for sizes Toddler and Child are in parentheses.
- •Helpful resources: patterns catalog, crochet patterns for adults, Craft Yarn Council, Ravelry.
With smaller hook and A, make an adjustable ring, ch 1.
Round 1 (right side): Work 10 hdc in ring; join with slip st in top of first hdc—10 hdc. Pull gently, but firmly, on tail to tighten ring. Place marker for beginning of round and move marker up as each round is completed.
Round 2: Ch 1 (does not count as a st here or throughout), 2 hdc in each st; join with slip st in first st—20 hdc.
Round 3: Ch 1, (hdc in next st, 2 hdc in next st) 10 times; join with slip st in first st—30 hdc.
Round 4: Ch 1, (hdc in next 2 sts, 2 hdc in next st) 10 times; join with slip st in first st—40 hdc.
Round 5: Ch 1, (hdc in next 3 sts, 2 hdc in next st) 10 times; join with slip st in first st—50 hdc.
Size Baby only: Round 6: Ch 1, (hdc in next 9 sts, 2 hdc in next st) 5 times; join with slip st in first st—55 hdc.
Size Baby only: Rounds 7–15: Ch 1, hdc in each st; join with slip st in first st. Do not fasten off.
Size Toddler only: Round 6: Ch 1, (hdc in next 4 sts, 2 hdc in next st) 10 times; join with slip st in first st—60 hdc.
Size Toddler only: Round 7: Ch 1, (hdc in next 29 sts, 2 hdc in next st) 2 times; join with slip st in first st—62 hdc.
Size Toddler only: Rounds 8–17: Ch 1, hdc in each st; join with slip st in first st. Do not fasten off.
Size Child only: Round 6: Ch 1, (hdc in next 4 sts, 2 hdc in next st) 10 times; join with slip st in first st—60 hdc.
Size Child only: Round 7: Ch 1, (hdc in next 5 sts, 2 hdc in next st) 10 times; join with slip st in first st—70 hdc.
Size Child only: Rounds 8–19: Ch 1, hdc in each st; join with slip st in first st—70 hdc. Do not fasten off.
All sizes: Right Earflap: Row 1 (right side): Ch 2 (counts as first hdc here and throughout), skip next st, hdc in next 7 sts, skip next st, hdc in next; leave remaining sts unworked, turn—9 hdc.
Rows 2, 4, and 6: Ch 1, sc in each st to beginning ch, sc in top of beginning ch, turn.
Row 3: Ch 2, skip next st, hdc in next 5 sts, skip next st, hdc in next, turn—7 hdc.
Row 5: Ch 2, skip next st, hdc in next 3 sts, skip next st, hdc in next, turn—5 hdc.
Row 7: Ch 2, skip next st, hdc in next st, skip next st, hdc in next, turn—3 hdc. Fasten off.
With right side of hat facing, place marker in 22nd (24th, 26th) st to the left of last st in Row 1 for placement of ears.
Left Earflap: With smaller hook, join A with slip st in marked st. Work same as Rows 1–7 of right earflap.
Border: Round 1: With smaller hook and right side facing, join A in any st at back of hat, ch 1, sc in same st as join and in each st around, working 3 sc in end of each row of earflap; join with slip st in first sc. Fasten off. Weave in ends.
Ears (make 2): With smaller hook, A, and leaving a long tail, make an adjustable ring, ch 2.
Row 1 (wrong side): Work 11 dc in ring (beginning ch counts as first dc), turn—12 dc.
Row 2: Ch 1, hdc in each st around, with wrong side facing, ch 3, slip st through center of ring—12 hdc. Fasten off, leaving a long tail for sewing. Pull gently, but firmly, on tail to tighten ring.
Crown: With B, ch 40; taking care not to twist ch, join with slip st in first ch to form ring.
Round 1 (right side): Ch 1, sc in each ch; join with slip st in first st—40 sc. Place marker for beginning of round and move marker up as each round is completed.
Work same as Rounds 1–3 of crown of hat.
Round 2: [Slip st in next st, (sc, picot, sc) in next st] 20 times; join with slip st in first st. Fasten off.
Round 3: With right side facing, join D with slip st around post of any st in Round 1, slip st loosely around post of each st. Fasten off.
Finishing: With seam at center back, flatten hat and place stitch markers on each end of Round 4 for ear placement. With beginning and end tails, tie each ear to marked stitch. With B, whipstitch crown to Round 4.
Braids: Cut 18 lengths of A, each measuring 25” (63.5 cm). Separate into 6 hanks of 3 strands each. Thread 3 hanks through last row of earflap and fold over so strands are doubled. Braid doubled hanks until 4” (10 cm) of strands remain, tie an overhand knot tightly, and trim ends evenly. Repeat with remaining hanks for other earflap.
Pillow
0/13Notes
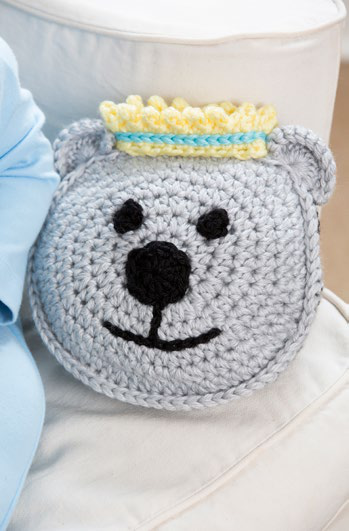
- •Pillow is made of 2 sides, each worked in joined rounds. Bear features are made in separate pieces and sewn to pillow.
Sides (make 2: 1 in A and 1 in C): With larger hook and two strands yarn held together, make an adjustable loop, ch 1.
Work same as Rounds 1–7 of size Child hat.
Ears (make 2): With larger hook, 2 strands of A held together, and leaving a long tail, make an adjustable ring, ch 2.
Work same as Rows 1 and 2 of ears of hat.
Center crown: With larger hook and 2 strands of B held together, ch 28; taking care not to twist ch, join with slip st in first ch to form ring. Work same as Rounds 1–3 of crown of hat.
Nose: With larger hook and C, make an adjustable loop, ch 2.
Round 1 (right side): Work 11 dc in ring (beginning ch counts as first dc); join with slip st in top of beginning ch—12 dc. Fasten off, leaving a 10” (25.5 cm) tail for sewing.
Eye (make 2): With larger hook and C, make an adjustable loop, ch 1.
Round 1 (right side): Work 8 sc in ring; join with slip st in top of first st—8 sc. Fasten off, leaving a 10” (25.5 cm) tail for sewing.
Finishing: Using photograph as a guide, sew eyes and nose to side A of pillow.
To form mouth, join C with slip st to lower center edge of nose, work 4 slip sts evenly down to Round 5. Fasten off. Join C with slip st between Rounds 4 and 5 around 5th st from either side of vertical stitching just made; working around sts along curve of the rounds, work 9 slip sts evenly—10 slip sts. Fasten off.
Border: With wrong sides together, larger hook, 2 strands of A held together, and working through both thicknesses, join yarn with slip st to left lower end of sides, ch 1, sc in same st as join and in each st around; leave 20 sts at bottom unworked.
Place marker in last stitch so it does not unravel, drop hook, and sew remaining pieces. Center crown on top of pillow over border and sew in place. Sew ears on each side of crown. Stuff pillow with fiberfill. Weave in ends.
FAQ
Questions about this pattern
Is Free Crochet Prince Bear Pillow Hat Pattern good for beginners?+
Yes. Free Crochet Prince Bear Pillow Hat Pattern is marked easy and includes step-by-step instructions, materials, gauge notes, and progress checkboxes.
What yarn weight do I need for Free Crochet Prince Bear Pillow Hat Pattern?+
This pattern lists Worsted (4). If you substitute yarn, make a gauge swatch before starting so the finished size stays close to the pattern notes.
How long does Free Crochet Prince Bear Pillow Hat Pattern take to crochet?+
The estimated time is 10–15 hours. Your pace may change depending on yarn choice, stitch familiarity, and how much finishing the project needs.
Do I need to check gauge for this crochet pattern?+
Yes. The pattern gauge is 11 hdc = 3” (7.5 cm); 11 rows = 4” (10 cm). Use the listed hook size, 5mm (H-8 US), unless your swatch tells you to adjust. Checking gauge helps avoid a finished project that is too small, too large, or too stiff.
Can I print Free Crochet Prince Bear Pillow Hat Pattern?+
Yes. Use the Print button near the top of the post for a cleaner pattern view that hides interactive extras and navigation.