
Pattern guide
Helpful notes for making this pattern
This Free Crochet Backpack Pattern with Drawstring Closure is a fantastic project for beginners looking to create a functional and stylish accessory. With its roomy design and easy-to-follow instructions, this backpack is perfect for everyday use or weekend outings. The drawstring closure adds a trendy touch while keeping your belongings secure. The bulky yarn ensures that the bag works up quickly, making it an ideal choice for those who want to see fast results from their crochet efforts.
Why this project is worth making
- It's a practical accessory that can be used for various occasions, from casual outings to gym sessions.
- The drawstring closure not only looks great but also provides easy access to your belongings.
- This project is beginner-friendly, allowing new crocheters to build confidence and skills with simple stitches.
Maker tips before you begin
- Before starting, familiarize yourself with the gauge to ensure your backpack turns out the right size; a swatch can help avoid sizing issues.
- Use stitch markers to keep track of rounds, especially when working with bulky yarn, to maintain consistent tension.
- Consider using a different color for the drawstring to add a pop of contrast and personalize your backpack.
- Keep your workspace organized; having all materials at hand will make the crocheting process smoother and more enjoyable.
Ways to customize it
- Adjust the size of the backpack by adding or subtracting rows in the body section to fit your needs.
- Experiment with different color combinations using the yarn options available to create a unique look.
- Add pockets or embellishments like patches or embroidery to personalize your backpack further.
Troubleshooting notes
- If your stitches are too tight, try using a larger hook size to achieve a looser tension, which will make the bag more flexible.
- To avoid uneven edges, ensure you are counting your stitches accurately at the end of each round.
- If the drawstring is too short, you can easily add extra chains to the length or crochet a longer one to ensure it fits comfortably.
Care and finishing
- After completing your backpack, consider blocking it to help shape the finished product and enhance its appearance.
- For washing, use a gentle cycle and lay flat to dry to maintain the shape and texture of the bulky yarn.
Instructions
Bottom
0/4Notes
- •Before beginning, you can review standard sizing and symbols on the Craft Yarn Council reference guide, or browse our other crochet accessories for more ideas.
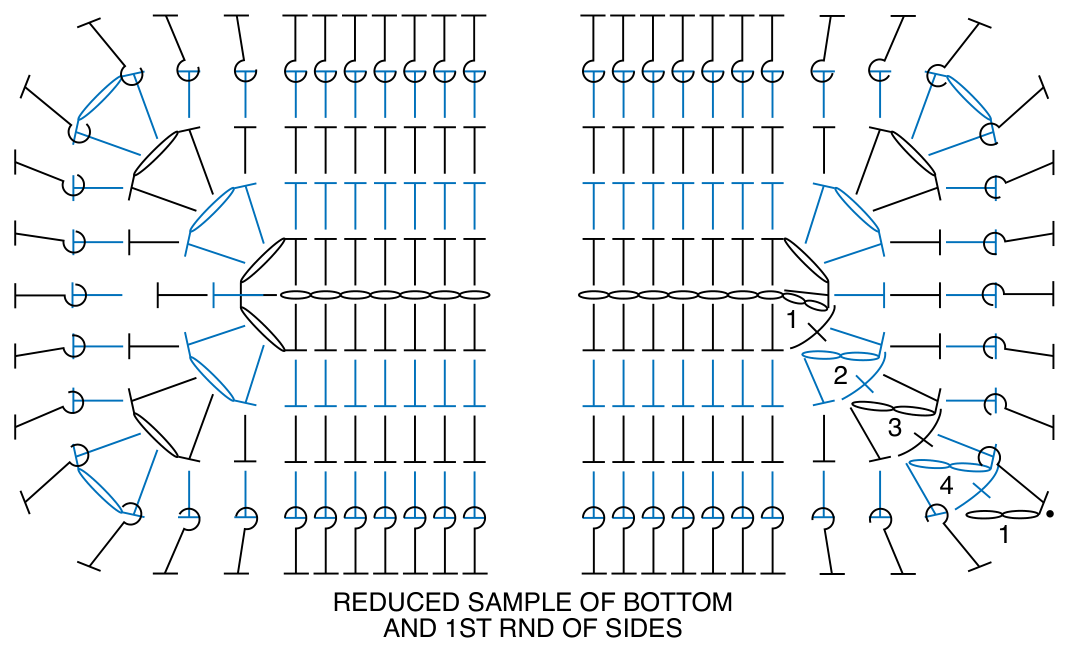
With A, ch 30.
1st rnd: (1 hdc. Ch 1. 1 hdc) in 3rd ch from hook. PM on ch-1 sp. 2 hdc in each ch to last ch. [(1 hdc. Ch 1) twice. 1 hdc] in last 3 ch. PM on 1st and 2nd ch-1 sps. Do not turn. Working across rem loops of foundation ch, 1 hdc in each of next 26 ch. 1 hdc in ch where first hdc made. Join with sc to top of first hdc (counts as ch-1 sp). 58 hdc and 4 ch-1 sps.
2nd rnd: Ch 2. 1 hdc around post of joining sc. 1 hdc in next hdc. (1 hdc. Ch 1. 1 hdc) in next ch-1 sp. 1 hdc in each hdc to next ch-1 sp. (1 hdc. Ch 1. 1 hdc) in next ch-1 sp. 1 hdc in next hdc. (1 hdc. Ch 1. 1 hdc) in next ch-1 sp. 1 hdc in each hdc to end of rnd. 1 hdc around post of joining sc. Join with sc to top of first hdc. 66 hdc and 4 ch-1 sps.
3rd and 4th rnds: Ch 2. 1 hdc around post of joining sc. *1 hdc in each hdc to next ch-1 sp. (1 hdc. Ch 1. 1 hdc) in next ch-1 sp. Rep from * twice more. 1 hdc in each hdc to end of rnd. 1 hdc around post of joining sc. Join with sc to top of first hdc. 82 hdc and 4 ch-1 sps.


Sides
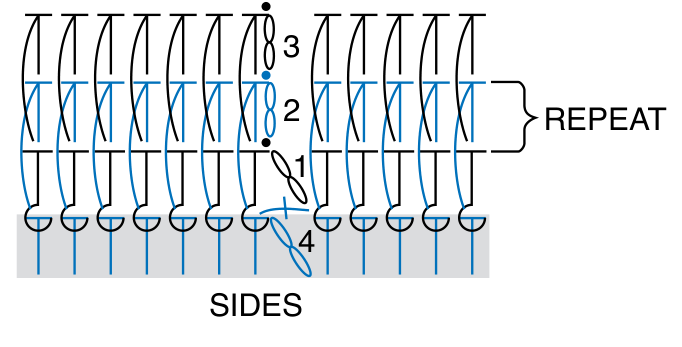
0/81st rnd: Ch 2. 1 hdcbp around each hdc, skipping ch-1 sps, to end of rnd. Join with sl st to first hdc. 82 sts.
2nd rnd: Ch 2. 1 hdc in each hdc around. Join with sl st to first st.
3rd rnd: Ch 2. 1 hdcrb in each st around. Join with sl st to first st.
EYELET RND: Cont in Stripe Pat, rep last rnd until all 48 rnds of Stripe Pat are complete.
With A, rep last rnd until work from beg (with Backpack lying flat) measures 15" [38 cm].
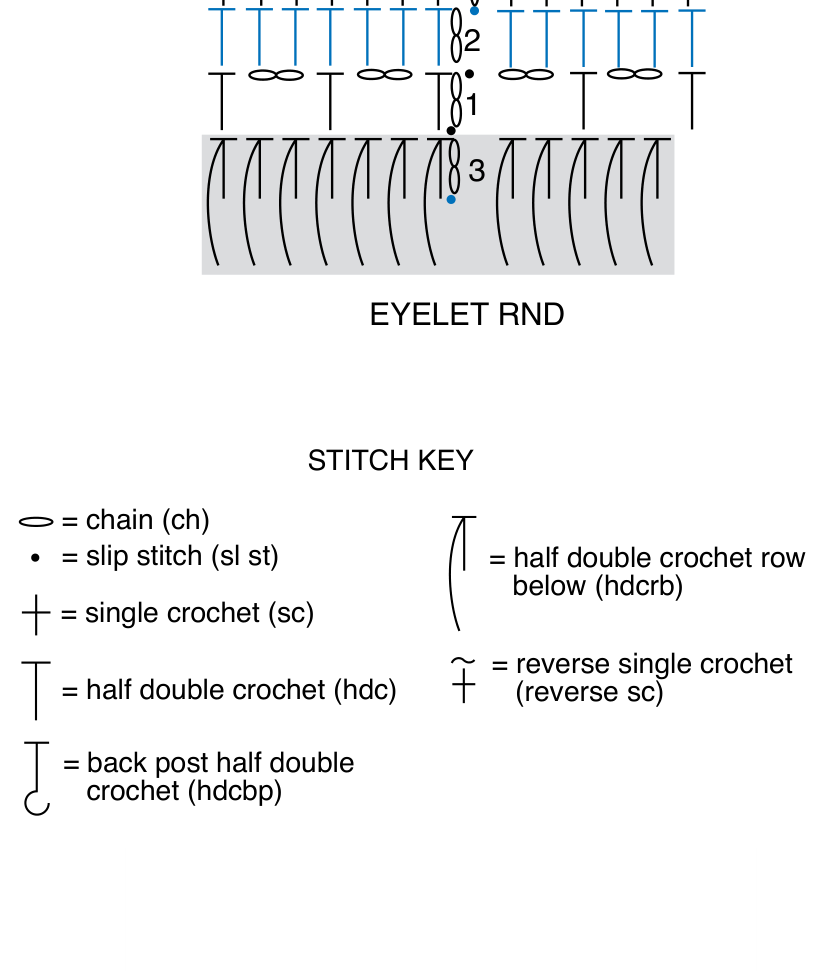
Eyelet rnd: 1st rnd: With A, ch 2. 1 hdc in first st. *Ch 2. Skip next st. 1 hdc in next st. Rep from * to last st. Ch 2. Join.
2nd rnd: Ch 2. 1 hdc in first st. *2 hdc in next ch-2 sp. 1 hdc in next hdc. Rep from * to last ch-2 sp. 1 hdc in last ch-2 sp. Join.
3rd rnd: Ch 1. Working from left to right, instead of from right to left, as usual, work 1 reverse sc in each st around. Join with sl st to first sc. Fasten off.


Straps
0/5With A, ch 7.
1st row: 1 sc in 2nd ch from hook. 1 sc in each ch to end of chain. Turn. 6 sc.
2nd row: Ch 1. 1 sc in each sc to end of row. Turn.
3rd row: Ch 1. 1 sc in first sc. (1 long sc in next sc 2 rows below. 1 sc in next sc) twice. 1 long sc in last sc. Turn.
Rep last row until Strap measures approx 38" [96.5 cm] or desired length. Fasten off, leaving long end.


Drawstring
0/5With A or color of your choice, ch 190.
Rotate chain and working in back ‘bumps’, sl st in each ‘bump’ to end of chain. Fasten off.
Thread Drawstring through Eyelet rnd, beg and end at center front of Backpack.
Pin 2 Straps to Front spaced approx 7" [18 cm] apart. Beg at top and below Eyelet rnd, down to Base, across Base and 2" [5 cm] up at Back, sew Straps in place.
Sew other end of Straps at top of Back and below Eyelet rnd.

FAQ
Questions about this pattern
Is Free Crochet Backpack Pattern with Drawstring Closure good for beginners?+
Yes. Free Crochet Backpack Pattern with Drawstring Closure is marked easy and includes step-by-step instructions, materials, gauge notes, and progress checkboxes.
What yarn weight do I need for Free Crochet Backpack Pattern with Drawstring Closure?+
This pattern lists Bulky (5). If you substitute yarn, make a gauge swatch before starting so the finished size stays close to the pattern notes.
How long does Free Crochet Backpack Pattern with Drawstring Closure take to crochet?+
The estimated time is 15–20 hours. Your pace may change depending on yarn choice, stitch familiarity, and how much finishing the project needs.
Do I need to check gauge for this crochet pattern?+
Yes. The pattern gauge is 14 sc and 16 rows = 4" [10 cm]. 11 sts and 13 rows = 4" [10 cm] in Hdcrb Pat.. Use the listed hook size, U.S. 7 (4.5 mm), unless your swatch tells you to adjust. Checking gauge helps avoid a finished project that is too small, too large, or too stiff.
Can I print Free Crochet Backpack Pattern with Drawstring Closure?+
Yes. Use the Print button near the top of the post for a cleaner pattern view that hides interactive extras and navigation.