Pattern guide
Helpful notes for making this pattern
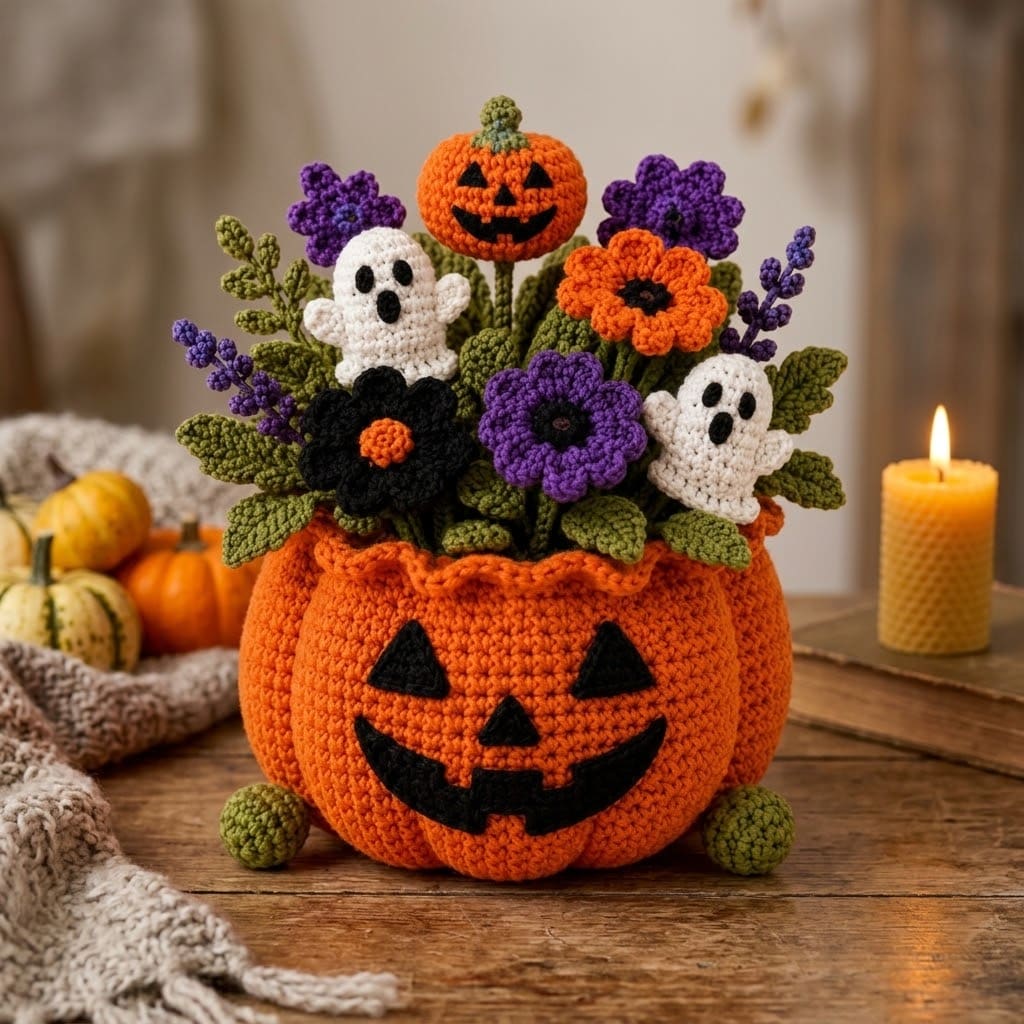
This festive pumpkin pot doubles as a playful centerpiece packed with handmade Halloween charm. It combines sculpted amigurumi, floral blooms, and cute ghost picks for a complete seasonal display.
Why this project is worth making
- Offers a fun mix of amigurumi and floral crochet techniques.
- Serves as durable, reusable handmade autumn decor year after year.
- Great stash-busting project for small amounts of Halloween-toned yarns.
Maker tips before you begin
- Keep tension tight on the amigurumi toppers so the fiberfill doesn't peek through stitches.
- Securely anchor support stems inside the pot base to keep tall floral and ghost picks upright.
- Cinch the pumpkin ribbing firmly with matching yarn before attaching the facial features.
Ways to customize it
- Swap petal colors on the blossom flowers to match your preferred seasonal palette.
- Add more or fewer ghost picks and mini pumpkins to alter the density of the bouquet.
- Embroider alternative expressive faces on the ghosts or jack-o'-lanterns.
Troubleshooting notes
- If the pot tilts, ensure the green spherical feet are spaced evenly along the bottom base.
- If stems wobble, wrap them with additional yarn or insert dense floral foam inside the pot cavity.
Care and finishing
- Spot clean gently with a damp cloth and mild detergent if dusty.
- Air dry thoroughly and store upright in a cool, dry place away from direct sunlight to preserve yarn colors.
Instructions
Pumpkin Base Pot
0/3Notes
- •Worked in joined or continuous rounds with bright orange yarn, sculpted with vertical indentations, and finished with a ruffled upper collar.
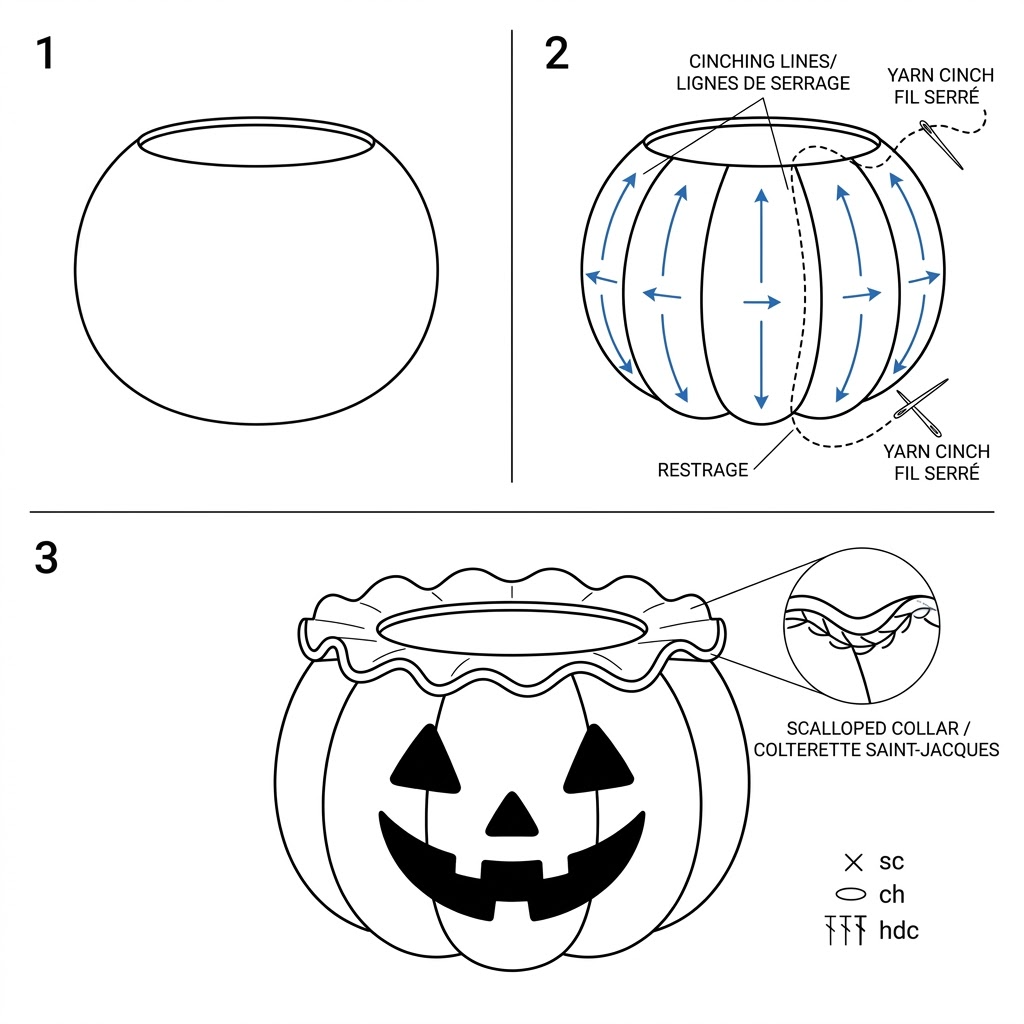
Crochet a rounded, segmented pumpkin-shaped bowl using orange yarn, shaping the base and working upward in single crochet.
Work a flared, wavy scalloped collar around the upper opening in single crochet and chain/half double crochet stitches to form the ruffled pot rim.
Use yarn to cinch vertical segments into the outer walls of the pot to define pumpkin ribs.
Pot Feet (Make 2 or 4)
0/2Notes
- •Small spherical feet supporting the base.
Crochet small stuffed spheres in muted olive green yarn using single crochet rounds.
Fasten off and sew the green spheres symmetrically to the underside of the orange pumpkin pot to act as feet.
Jack-o'-Lantern Face Details
0/2Notes
- •Worked in flat black crochet pieces or cut felt appliquéd to the front.
Crochet two triangular eyes, one small triangular nose, and a curved jagged jack-o'-lantern smile with center teeth using black yarn.
Sew the facial features securely onto the front center segment of the pumpkin pot.
Mini Jack-o'-Lantern Topper
0/4Notes
- •Positioned at the top center on a stem.
Crochet a small spherical pumpkin body in orange yarn, stuffing firmly.
Crochet a small green stem and attach to the top of the mini pumpkin.
Embroider or sew black triangle eyes, nose, and smiling mouth onto the front of the mini pumpkin.
Attach the mini pumpkin to a wrapped wire stem.
Ghost Picks (Make 2)
0/5Notes
- •Stuffed white figures with arms and ruffled wavy skirts.
Crochet a rounded ghost head working downward into a cylindrical body in white yarn, lightly stuffing.
Crochet two small curved arm pieces and attach to the sides of each ghost body.
Work a ruffled scalloped hem along the bottom edge of each ghost body.
Embroider or attach black oval eyes and an open oval mouth onto each ghost face.
Mount each ghost onto a support stem.
Halloween Blossom Flowers
0/4Notes
- •Petaled flowers in purple, orange, and black with contrasting centers.
Crochet circular flower centers with contrasting round centers (orange center with black petals, black center with purple petals, black center with orange petals).
Work looped or scalloped multi-petal edges around the center rings in double crochet and slip stitch groups.
Crochet textured purple sprigs with small popcorn/bobble clusters along an elongated stem to resemble lavender sprigs.
Secure flower heads and lavender sprigs onto wrapped stems.
Foliage Leaves
0/2Notes
- •Pointed leaves and branch stems in muted olive green yarn.
Crochet individual pointed ovate leaves with central veins using olive green yarn.
Crochet multi-leaf sprigs on slender olive green stems.
Arrangement and Final Assembly
0/3Notes
- •Arranging the floral components inside the pumpkin pot.
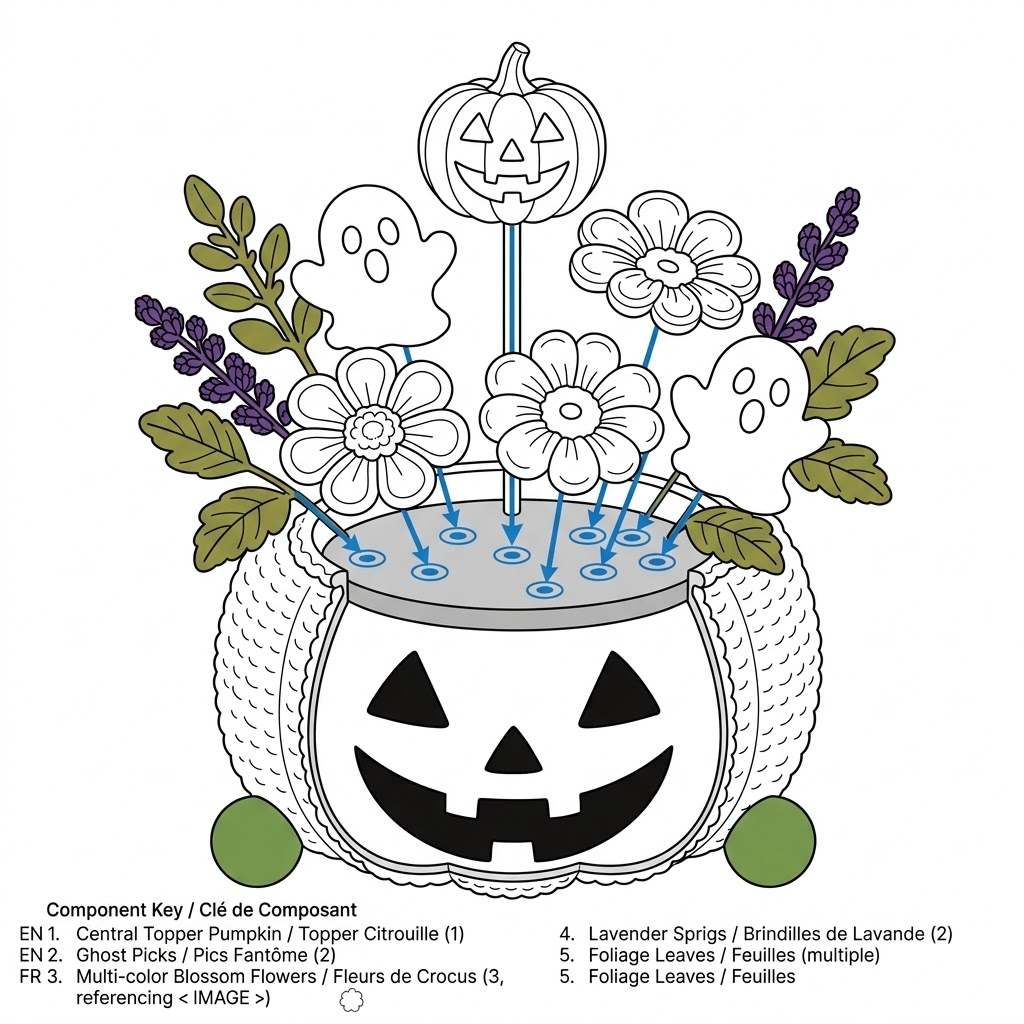
Insert an inner base or filler into the pumpkin pot to anchor stems.
Position the mini jack-o'-lantern topper at the top center of the bouquet.
Arrange the ghost figures, multi-color blossom flowers, purple sprigs, and green foliage stems around the central topper to fill the pot opening densely.
FAQ
Questions about this pattern
Is Free Crochet Halloween Pumpkin Pot good for beginners?+
Free Crochet Halloween Pumpkin Pot is marked intermediate, so it is better after you have finished a few crochet patterns for beginners. Read the full instructions first and check each shaping or assembly note before starting.
What yarn weight do I need for Free Crochet Halloween Pumpkin Pot?+
This pattern lists 4-worsted-medium. If you substitute yarn, make a gauge swatch before starting so the finished size stays close to the pattern notes.
How long does Free Crochet Halloween Pumpkin Pot take to crochet?+
The estimated time is 6-8 hours. Your pace may change depending on yarn choice, stitch familiarity, and how much finishing the project needs.
Do I need to check gauge for this crochet pattern?+
Yes. The pattern gauge is Not specified. Use the listed hook size, Not specified, unless your swatch tells you to adjust. Checking gauge helps avoid a finished project that is too small, too large, or too stiff.
Can I print Free Crochet Halloween Pumpkin Pot?+
Yes. Use the Print button near the top of the post for a cleaner pattern view that hides interactive extras and navigation.