Pattern guide
Helpful notes for making this pattern
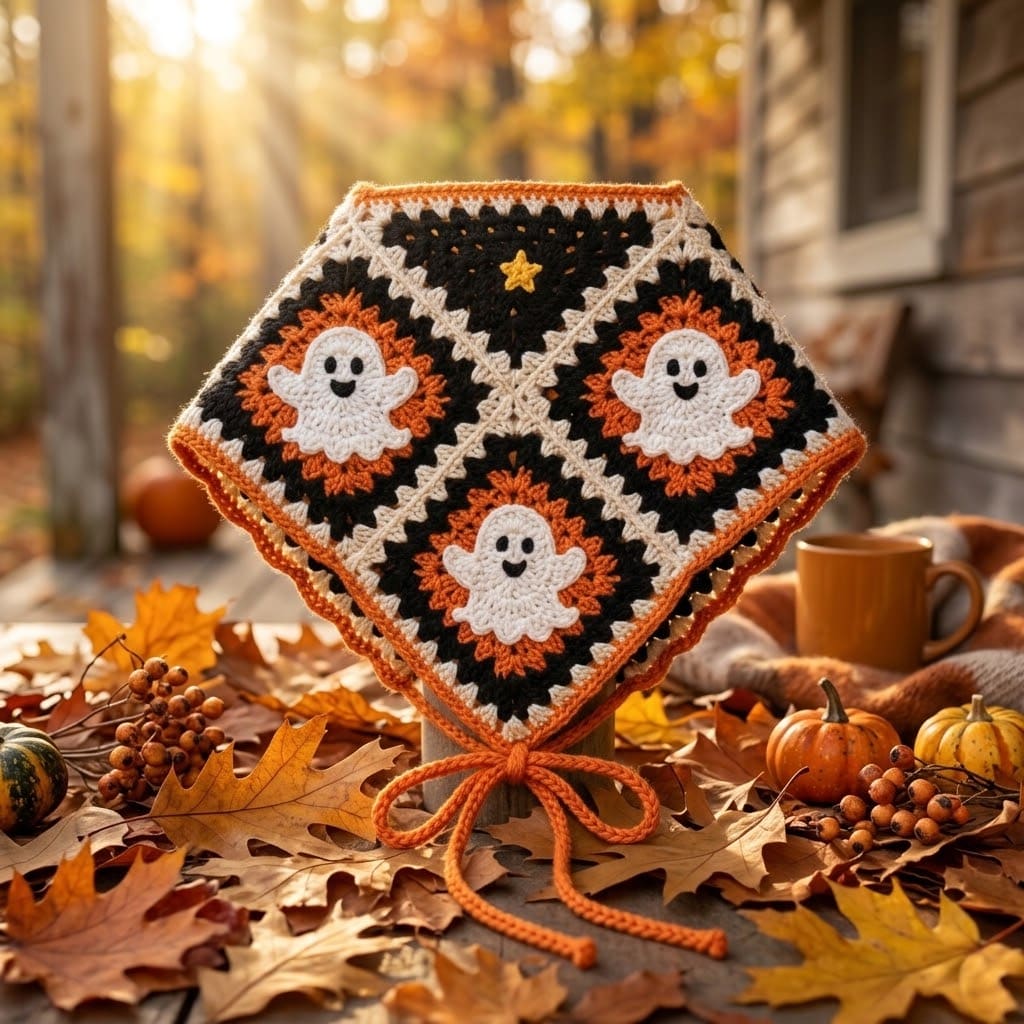
This Halloween Bandana pairs playful ghost motifs with bold seasonal colors. Cream joins, contrasting edging, and orange ties complete the look.
Why this project is worth making
- Features cheerful ghost granny-square motifs.
- Uses a striking black, orange, cream, white, and yellow palette.
- Creates a festive Halloween accessory.
Maker tips before you begin
- Keep motif joins neat and consistent.
- Maintain an even finish along the contrasting edge.
- Finish the crochet ties neatly.
Ways to customize it
- Adjust the visible color palette for a different Halloween look.
- Use contrasting colors to emphasize the ghost motifs.
Troubleshooting notes
- Check that joined motifs sit neatly together.
- Keep edging consistent around the bandana.
Care and finishing
- Care requirements are not specified by the source.
- Follow appropriate care guidance for the yarn used.
Instructions
Before You Start
0/1Notes
- •US crochet terminology is used.
- •Chain 3 at the beginning of a granny row counts as one double crochet.
- •The pictured item is used as visual inspiration; this is a newly drafted pattern.
Make one granny motif first, block it to 8 cm / 3¼ in square, and change hook size if needed.
Crochet the Triangle Base
0/5Notes
- •Work in turning rows with black yarn. The chain-2 space forms the lower point.
Row 1 (RS): Make a magic ring; ch 3, 2 dc, ch 2, 3 dc in the ring; pull the ring closed and turn.
Row 2: Ch 3, 2 dc in the first stitch, ch 1, (3 dc, ch 2, 3 dc) in the center ch-2 space, ch 1, 3 dc in the top of the turning chain; turn.
Row 3: Ch 3, 2 dc in the first stitch, ch 1, 3 dc in each ch-1 space to the center, ch 1, (3 dc, ch 2, 3 dc) in the center space, ch 1, 3 dc in each remaining ch-1 space, ch 1, 3 dc in the top of the turning chain; turn.
Rows 4–16: Repeat Row 3, adding one 3-dc cluster on each side of the center in every row; fasten off after Row 16.
Block the triangle to approximately 48 cm / 19 in across the top and 24 cm / 9½ in deep, keeping the center point sharp.
Make Three Granny Motifs
0/5Notes
- •Make three identical motifs. Change color by completing the final yarn-over of the previous round with the new color.
Round 1, orange: In a magic ring, ch 3, 2 dc, ch 2; repeat (3 dc, ch 2) three more times; join with a sl st and close the ring.
Round 2, black: Sl st to a corner; ch 3, 2 dc, ch 2, 3 dc in that corner, then work (3 dc, ch 2, 3 dc) in each remaining corner; join.
Round 3, orange: In each corner work (3 dc, ch 2, 3 dc); in each side space work 3 dc, placing ch 1 between every cluster; join.
Round 4, black: Repeat the established granny-square pattern, working one 3-dc cluster in every side space and (3 dc, ch 2, 3 dc) in every corner; join.
Round 5, cream: Ch 1, sc in every stitch and ch-1 space, work 3 sc in each corner ch-2 space, join, and fasten off.
Make Three Ghost Appliqués
0/7Notes
- •Make three in white. Turning chains do not count as stitches.
Ch 5; Row 1: Sc in the second chain from the hook and in the next 3 chains — 4 sc; turn.
Row 2: Ch 1, inc, sc in next 2 stitches, inc — 6 sc; turn.
Row 3: Ch 1, inc, sc in next 4 stitches, inc — 8 sc; turn.
Rows 4–7: Ch 1, sc in each of the 8 stitches; turn.
Row 8: Ch 4, sc in the second chain and next 2 chains, sc across the 8 body stitches, ch 4, sc in the second chain and next 2 chains, then sl st to the side of the body; fasten off.
Join white yarn at the lower-left corner and work (sl st, 3 dc, sl st) twice evenly across the lower edge to form two soft scallops; fasten off.
With black yarn, embroider two small eyes and a short smiling mouth, securing all ends on the wrong side.
Assembly and Placement
0/3Notes
- •Use the photograph as a placement guide while keeping all motifs inside the triangle edges.
Center one ghost on each granny motif and whipstitch around the white outer edge with matching yarn.
Pin two motifs side by side across the upper half of the triangle and center the third motif below them, leaving an even black border around the group.
Using cream yarn, whipstitch each motif securely to the triangle through the back loops of the cream border; remove the pins and weave in all ends.
Edging and Ties
0/5Notes
- •Work loosely so the top edge remains flat.
Join orange yarn at the left end of the straight top edge, ch 76, sl st in the second chain from the hook and in every chain back to the bandana to form the first tie.
Sc evenly across the straight top edge to the opposite corner.
Ch 76, sl st in the second chain from the hook and in every chain back to the bandana to form the second tie.
Continue with sc evenly down the right slanted edge, work 3 sc in the lower point, and sc evenly up the left slanted edge; join with a sl st.
Fasten off, weave in every end, lightly wet-block to the finished measurements, and allow the bandana to dry completely.
FAQ
Questions about this pattern
Is Free Halloween Bandana Crochet Pattern good for beginners?+
Free Halloween Bandana Crochet Pattern is marked intermediate, so it is better after you have finished a few crochet patterns for beginners. Read the full instructions first and check each shaping or assembly note before starting.
What yarn weight do I need for Free Halloween Bandana Crochet Pattern?+
This pattern lists DK / Light (3). If you substitute yarn, make a gauge swatch before starting so the finished size stays close to the pattern notes.
How long does Free Halloween Bandana Crochet Pattern take to crochet?+
The estimated time is 8–12 hours. Your pace may change depending on yarn choice, stitch familiarity, and how much finishing the project needs.
Do I need to check gauge for this crochet pattern?+
Yes. The pattern gauge is One completed granny motif measures 8 cm / 3¼ in square after blocking. For the triangle, 4 granny clusters and 4 chain-1 spaces measure approximately 10 cm / 4 in.. Use the listed hook size, 4 mm (G-6), or size needed for gauge, unless your swatch tells you to adjust. Checking gauge helps avoid a finished project that is too small, too large, or too stiff.
Can I print Free Halloween Bandana Crochet Pattern?+
Yes. Use the Print button near the top of the post for a cleaner pattern view that hides interactive extras and navigation.