Instructions
Free crochet pumpkin friend pattern Basics
0/34Notes
- •This Free crochet pumpkin friend pattern includes organized steps, materials, and helpful resources for crocheters.
- •This pattern is part of our crochet toy patterns collection. For more free designs, check out our free amigurumi patterns.
- •Work with A (Pumpkin) and smaller hook.
With A and smaller hook, ch 2.
1st rnd: 8 sc in 2nd ch from hook. Join with sl st to first sc.
2nd rnd: Ch 1. 2 sc in each sc around. Join with sl st to first sc. 16 sc.
3rd rnd: Ch 1. 2 sc in first sc. 1 sc in next sc. *2 sc in next sc. 1 sc in next sc. Rep from * around. Join with sl st to first sc. 24 sc.
4th rnd: Ch 1. 2 sc in first sc. 1 sc in each of next 2 sc. *2 sc in next sc. 1 sc in each of next 2 sc. Rep from * around. Join with sl st to first sc. 32 sc.
5th rnd: Ch 1. 2 sc in first sc. 1 sc in each of next 3 sc. *2 sc in next sc. 1 sc in each of next 3 sc. Rep from * around. Join with sl st to first sc. 40 sc.
6th rnd: Ch 1. 2 sc in first sc. 1 sc in each of next 4 sc. *2 sc in next sc. 1 sc in each of next 4 sc. Rep from * around. Join with sl st to first sc. 48 sc.
7th rnd: Ch 1. 2 sc in first sc. 1 sc in each of next 5 sc. *2 sc in next sc. 1 sc in each of next 5 sc. Rep from * around. Join with sl st to first sc. 56 sc.
8th rnd: Ch 1. 2 sc in first sc. 1 sc in each of next 6 sc. *2 sc in next sc. 1 sc in each of next 6 sc. Rep from * around. Join with sl st to first sc. 64 sc.
9th rnd: Ch 1. 2 sc in first sc. 1 sc in each of next 7 sc. *2 sc in next sc. 1 sc in each of next 7 sc. Rep from * around. Join with sl st to first sc. 72 sc. Place marker on last rnd.
10th rnd: Ch 1. 1 sc in each sc around. Join with sl st to first sc. Rep last rnd until work from marked rnd measures 5" [12.5 cm].
Beg dec rnds: 1st rnd: Ch 1. 1 sc in each of first 7 sc. *Sc2tog. 1 sc in each of next 7 sc. Rep from * to last 2 sc. Sc2tog. Join with sl st to first sc. 64 sts.
2nd rnd: Ch 1. 1 sc in each st around. Join with sl st to first sc.
3rd rnd: Ch 1. 1 sc in each st around. Join with sl st to first sc.
4th rnd: Ch 1. 1 sc in each st around. Join with sl st to first sc.
5th rnd: Ch 1. 1 sc in each st around. Join with sl st to first sc.
6th rnd: Ch 1. 1 sc in each of first 6 sc. *Sc2tog. 1 sc in each of next 6 sc. Rep from * to last 2 sc. Sc2tog. Join with sl st to first sc. 56 sts.
7th rnd: Ch 1. 1 sc in each st around. Join with sl st to first sc.
8th rnd: Ch 1. 1 sc in each st around. Join with sl st to first sc.
9th rnd: Ch 1. 1 sc in each st around. Join with sl st to first sc.
10th rnd: Ch 1. 1 sc in each st around. Join with sl st to first sc.
11th rnd: Ch 1. 1 sc in each of first 5 sc. *Sc2tog. 1 sc in each of next 5 sc. Rep from * to last 2 sc. Sc2tog. Join with sl st to first sc. 48 sts.
12th rnd: Ch 1. 1 sc in each st around. Join with sl st to first sc.
13th rnd: Ch 1. 1 sc in each st around. Join with sl st to first sc.
14th rnd: Ch 1. 1 sc in each st around. Join with sl st to first sc.
15th rnd: Ch 1. 1 sc in each st around. Join with sl st to first sc.
16th rnd: Ch 1. 1 sc in each of first 4 sc. *Sc2tog. 1 sc in each of next 4 sc. Rep from * to last 2 sc. Sc2tog. Join with sl st to first sc. 40 sts.
17th rnd: Ch 1. 1 sc in each st around. Join with sl st to first sc.
18th rnd: Ch 1. 1 sc in each st around. Join with sl st to first sc.
19th rnd: Ch 1. 1 sc in each st around. Join with sl st to first sc.
20th rnd: Ch 1. 1 sc in each st around. Join with sl st to first sc.
21st rnd: Ch 1. 1 sc in each of first 3 sc. *Sc2tog. 1 sc in each of next 3 sc. Rep from * to last 2 sc. Sc2tog. Join with sl st to first sc. 32 sts.
22nd rnd: Ch 1. 1 sc in each st around. Join with sl st to first sc. Fasten off.
Stuff Body.
Head
0/13Notes
- •For help with gauge, refer to the Craft Yarn Council or find this pattern on Ravelry.
Nose: With B and smaller hook, ch 2.
1st rnd: 8 sc in 2nd ch from hook. Join with sl st to first sc.
2nd rnd: Ch 1. 2 sc in each sc around. Join with sl st to first sc. 16 sc.
3rd and 4th rnds: Ch 1. 1 sc in each sc around. Join with sl st to first sc.
5th and 6th rnds: With A, ch 1. 1 sc in each sc around. Join with sl st to first sc.
7th rnd: Ch 1. 2 sc in each sc around. Join with sl st to first sc. 32 sc.
8th rnd: Ch 1. 1 sc in each sc around. Join with sl st to first sc.
9th rnd: Ch 1. 1 sc in each of first 3 sc. *2 sc in next sc. 1 sc in each of next 3 sc. Rep from * to last sc. 2 sc in last sc. Join with sl st to first sc. 40 sc.
10th rnd: Ch 1. 1 sc in each sc around. Join with sl st to first sc.
11th rnd: Ch 1. 1 sc in each of first 4 sc. *2 sc in next sc. 1 sc in each of next 4 sc. Rep from * to last sc. 2 sc in last sc. Join with sl st to first sc. 48 sc.
12th rnd: Ch 1. 1 sc in each sc around. Join with sl st to first sc.
Cont as established, inc 8 sc evenly spaced across every other rnd to 64 sc.
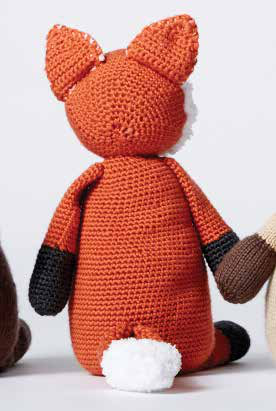
Sew Head to top of Body.
Fuzzy Beard
0/11With D and larger hook, ch 5.
1st row: 1 sc in 2nd ch from hook. 1 sc in each ch to end of chain. Turn. 4 sc.
2nd row: Ch 1. 2 sc in each sc to end of row. Turn. 8 sc.
3rd row: Ch 1. 2 sc in first sc. *1 sc in next sc. 2 sc in next sc. Rep from * to last sc. 1 sc in last sc. 12 sc.
4th row: As 3rd row. 18 sc.
5th row: Ch 1. 2 sc in first sc. *1 sc in each of next 2 sc. 2 sc in next sc. Rep from * to last 2 sc. 1 sc in each of last 2 sc. 24 sc.
6th row: Ch 1. 2 sc in first sc. *1 sc in each of next 3 sc. 2 sc in next sc. Rep from * to last 3 sc. 1 sc in each of last 3 sc. 30 sc.
7th row: Ch 1. 2 sc in first sc. *1 sc in each of next 4 sc. 2 sc in next sc. Rep from * to last 4 sc. 1 sc in each of last 4 sc. 36 sc.
Cont as established, inc 6 sc evenly spaced on each of next 4 rows. 60 sc at end of 11th row.
Fasten off.
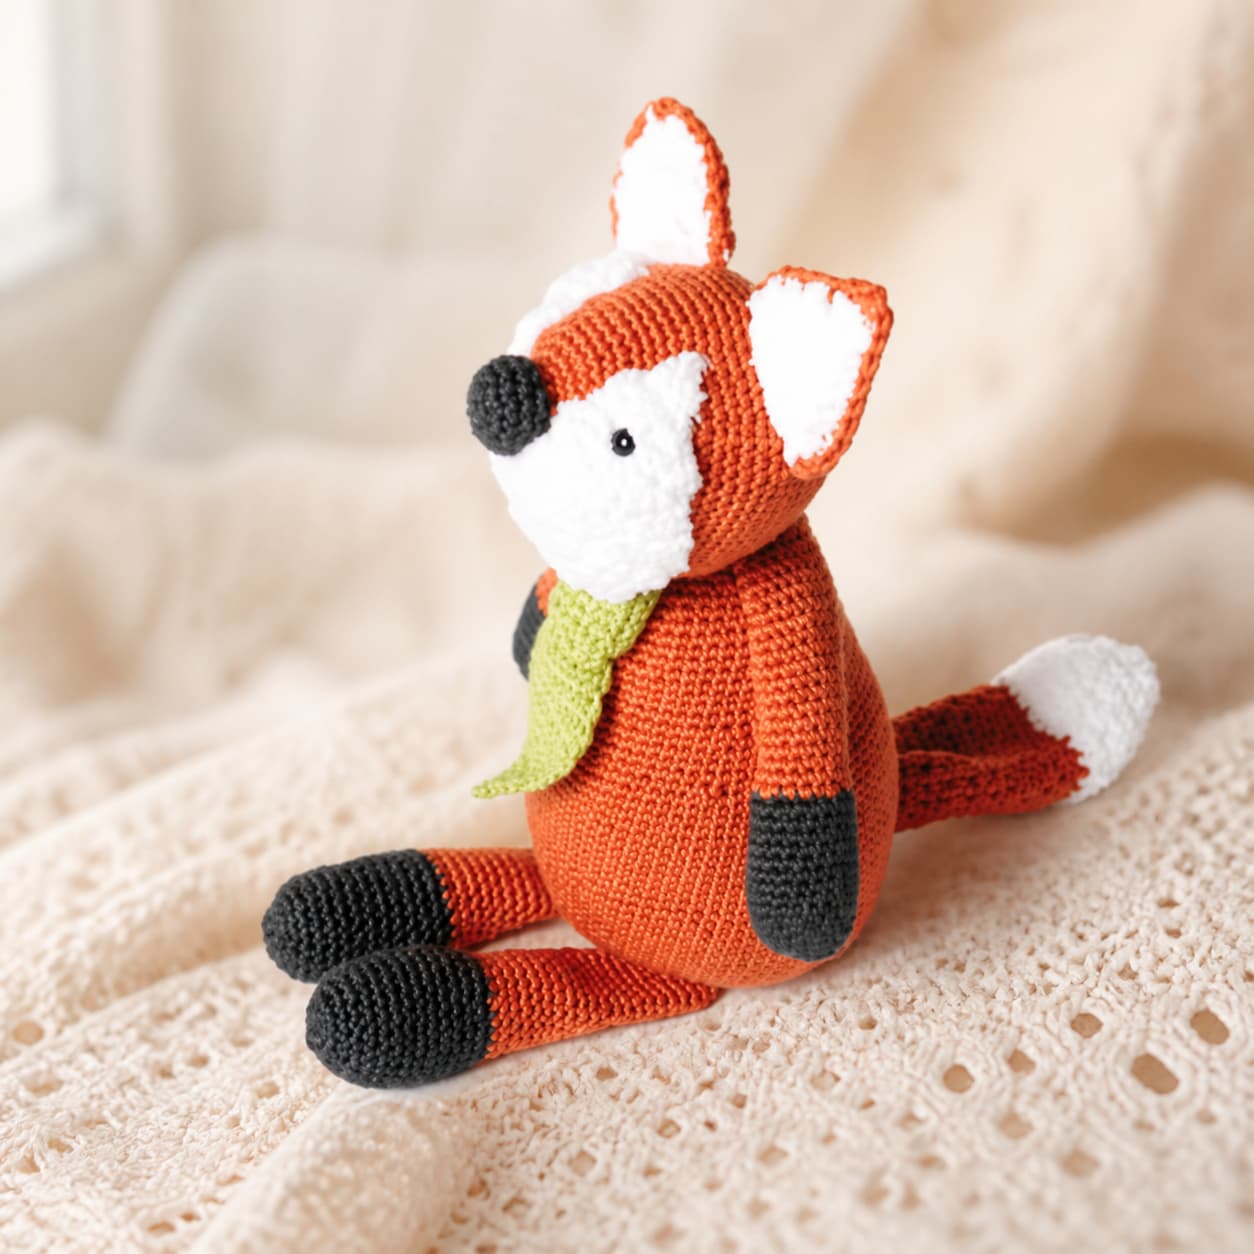
Curve Beard around bottom of Nose, and up sides of Face to create Beard shape as shown in picture. Attach Safety Eyes or buttons to part of Beard that curves upwards. Sew in position. With B, embroider mouth.
Ears
0/13Outer Ear (make 2): With smaller hook and A, ch 11.
1st row: 1 sc in 2nd ch from hook. 1 sc in each ch to end of ch. Turn. 10 sc.
2nd to 7th rows: Ch 1. 1 sc in each sc to end of row. Turn.
8th row: Ch 1. Sc2tog. 1 sc in each of next 6 sc. Sc2tog. Turn. 8 sts.
9th row: Ch 1. Sc2tog. 1 sc in each of next 4 sc. Sc2tog. Turn. 6 sts.
10th row: Ch 1. Sc2tog. 1 sc in each of next 2 sc. Sc2tog. Turn. 4 sts.
11th row: Ch 1. (Sc2tog) twice. Turn. 2 sts.
12th row: Ch 1. Sc2tog. Fasten off.
Inner Ear (make 2): With smaller hook and D, ch 9.
1st row: 1 sc in 2nd ch from hook. 1 sc in each ch to end of ch. Turn. 8 sc.
2nd and 3rd rows: Ch 1. 1 sc in each sc to end of row. Turn.
Holding WS of Outer and Inner Ears tog, with larger hook and 2 strands of A held tog, join with sl st to bottom right corner. Working through both thicknesses, Ch 1. Work 1 row of sc evenly to tip of Ear. Work 3 sc in tip of Ear. Work 1 row of sc evenly along left side edge. Fasten off.
Sew Ears to top of Head.
Arms
0/11With smaller hook and B, ch 2.
1st rnd: 8 sc in 2nd ch from hook. Join with sl st to first sc.
2nd rnd: Ch 1. 2 sc in each sc around. Join with sl st to first sc. 16 sc.
3rd rnd: Ch 1. 1 sc in each sc around. Join with sl st to first sc.
4th rnd: Ch 1. 1 sc in each of first 3 sc. *2 sc in next sc. 1 sc in each of next 3 sc. Rep from * to last sc. 2 sc in last sc. Join with sl st to first sc. 20 sc.
5th rnd: Ch 1. 1 sc in each sc around. Join with sl st to first sc.
Rep last rnd 9 times more. Break B, join A.
Next rnd: With A, ch 1. 1 sc in each of first 3 sc. *Sc2tog. 1 sc in each of next 3 sc. Rep from * to last 2 sc. Sc2tog. Join with sl st to first sc. 16 sts.
Next rnd: Ch 1. 1 sc in each st around. Join with sl st to first sc.
Rep last rnd until Arm measures approx 6" [15 cm] from beg. Fasten off.
Stuff Arms lightly. Sew Arms to either side of Body.
Legs
0/12With smaller hook and B, ch 2.
1st rnd: 8 sc in 2nd ch from hook. Join with sl st to first sc.
2nd rnd: Ch 1. 2 sc in each sc around. Join with sl st to first sc. 16 sc.
3rd rnd: Ch 1. 1 sc in each sc around. Join with sl st to first sc.
4th rnd: Ch 1. 1 sc in first sc. *2 sc in next sc. 1 sc in next sc. Rep from * to last sc. 2 sc in last sc. Join with sl st to first sc. 24 sc.
5th rnd: Ch 1. 1 sc in each sc around. Join with sl st to first sc.
Rep last rnd 9 times more. Break B, join A.
Next rnd: With A, ch 1. 1 sc in each of first 4 sc. *Sc2tog. 1 sc in each of next 4 sc. Rep from * to last 2 sc. Sc2tog. Join with sl st to first sc. 20 sts.
Next 10 rnds: Ch 1. 1 sc in each st around. Join with sl st to first sc.
Next rnd: Ch 1. 1 sc in each of first 3 sc. *Sc2tog. 1 sc in each of next 3 sc. Rep from * to last 2 sc. Sc2tog. Join with sl st to first sc. 16 sts.
Next 10 rnds: Ch 1. 1 sc in each st around. Join with sl st to first sc. Fasten off.
Stuff Legs lightly. Sew Legs to bottom of Body.
Tail
0/8With 2 strands of A held tog and larger hook, ch 20. Join with sl st to first ch.
1st rnd: Ch 2 (counts as hdc). 1 hdc in each ch around. Join with sl st to top of ch 2. 20 hdc.
2nd rnd: Ch 2 (counts as hdc). 1 hdc in each hdc around. Join with sl st to top of ch 2. Rep last rnd until Tail from beg measures approx 4" [10 cm]. Break A. Join 1 strand of D.
Next rnd: With D, ch 2 (counts as hdc). 1 hdc in each hdc around. Join with sl st to top of ch 2.
Next rnd: Ch 2 (counts as hdc). 1 hdc in each of next 2 hdc. Hdc2tog. *1 hdc in each of next 3 hdc. Hdc2tog. Rep from * around. Join with sl st to top of ch 2. 16 sts.
Next rnd: Ch 2 (counts as hdc). 1 hdc in next hdc. Hdc2tog. *1 hdc in each of next 2 hdc. Hdc2tog. Rep from * around. Join with sl st to top of ch 2. 12 sts.
Next rnd: Ch 2 (counts as hdc). *Hdc2tog. 1 hdc in next hdc. Rep from * to last 2 sts. Hdc2tog. Join with sl st to top of ch 2. 8 sts.
Next rnd: (Hdc2tog) 4 times. 4 sts. Fasten off, leaving a long end. Draw end tightly through rem loops. Fasten securely.
Necktie
0/7With C and smaller hook, ch 6.
1st row: 1 sc in 2nd ch from hook. 1 sc in each ch to end of ch. Turn. 5 sc.
2nd to 7th rows: Ch 1. 1 sc in each sc to end of row. Turn.
8th row: Ch 1. 2 sc in first sc. 1 sc in each sc to last sc. 2 sc in last sc. Turn. 7 sc.
9th row: As 8th row. 9 sc.
10th to 14th rows: Ch 1. 1 sc in each sc to end of row. Turn. 15th, 16th and 17th rows: Ch 1. Sc2tog. 1 sc in each sc to last 2 sc. Sc2tog. Turn. 3 sts rem.
18th row: Ch 1. Sc3tog. Fasten off.
Tie 'Knot'
0/5With C and smaller hook, ch 7.
1st row: 1 sc in 2nd ch from hook. 1 sc in each ch to end of ch. Turn. 6 sc.
2nd to 13th rows: Ch 1. 1 sc in each sc to end of row. Turn. Fasten off.
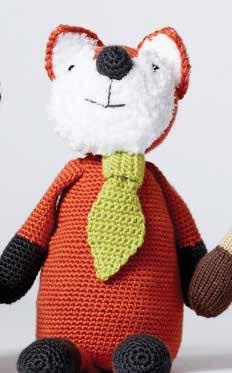
Sew last row and foundation row tog. Place Tie into loop of Tie 'knot' and sew in position.
Attach Tie to front of Body as shown in picture.
FAQ
Questions about this pattern
Is Free Crochet Fox Doll Pattern good for beginners?+
Free Crochet Fox Doll Pattern is marked intermediate, so it is better after you have finished a few crochet patterns for beginners. Read the full instructions first and check each shaping or assembly note before starting.
What yarn weight do I need for Free Crochet Fox Doll Pattern?+
This pattern lists Worsted (4) and Bulky (5). If you substitute yarn, make a gauge swatch before starting so the finished size stays close to the pattern notes.
How long does Free Crochet Fox Doll Pattern take to crochet?+
The estimated time is 15–20 hours. Your pace may change depending on yarn choice, stitch familiarity, and how much finishing the project needs.
Do I need to check gauge for this crochet pattern?+
Yes. The pattern gauge is With smaller hook, 17 sc and 18 rows = 4" [10 cm]. With larger hook, 9 sc and 12 rows = 4" [10 cm].. Use the listed hook size, U.S. E/4 (3.5 mm), unless your swatch tells you to adjust. Checking gauge helps avoid a finished project that is too small, too large, or too stiff.
Can I print Free Crochet Fox Doll Pattern?+
Yes. Use the Print button near the top of the post for a cleaner pattern view that hides interactive extras and navigation.